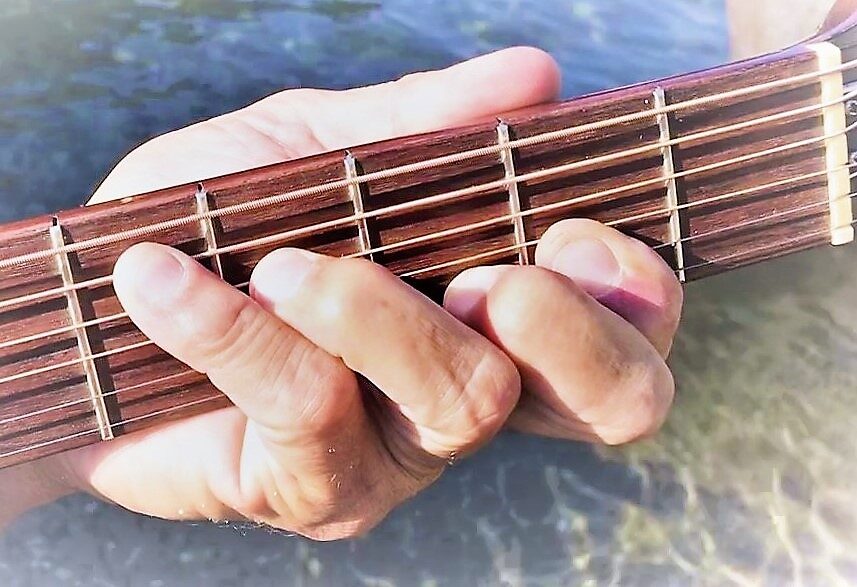
#1 The E Chord
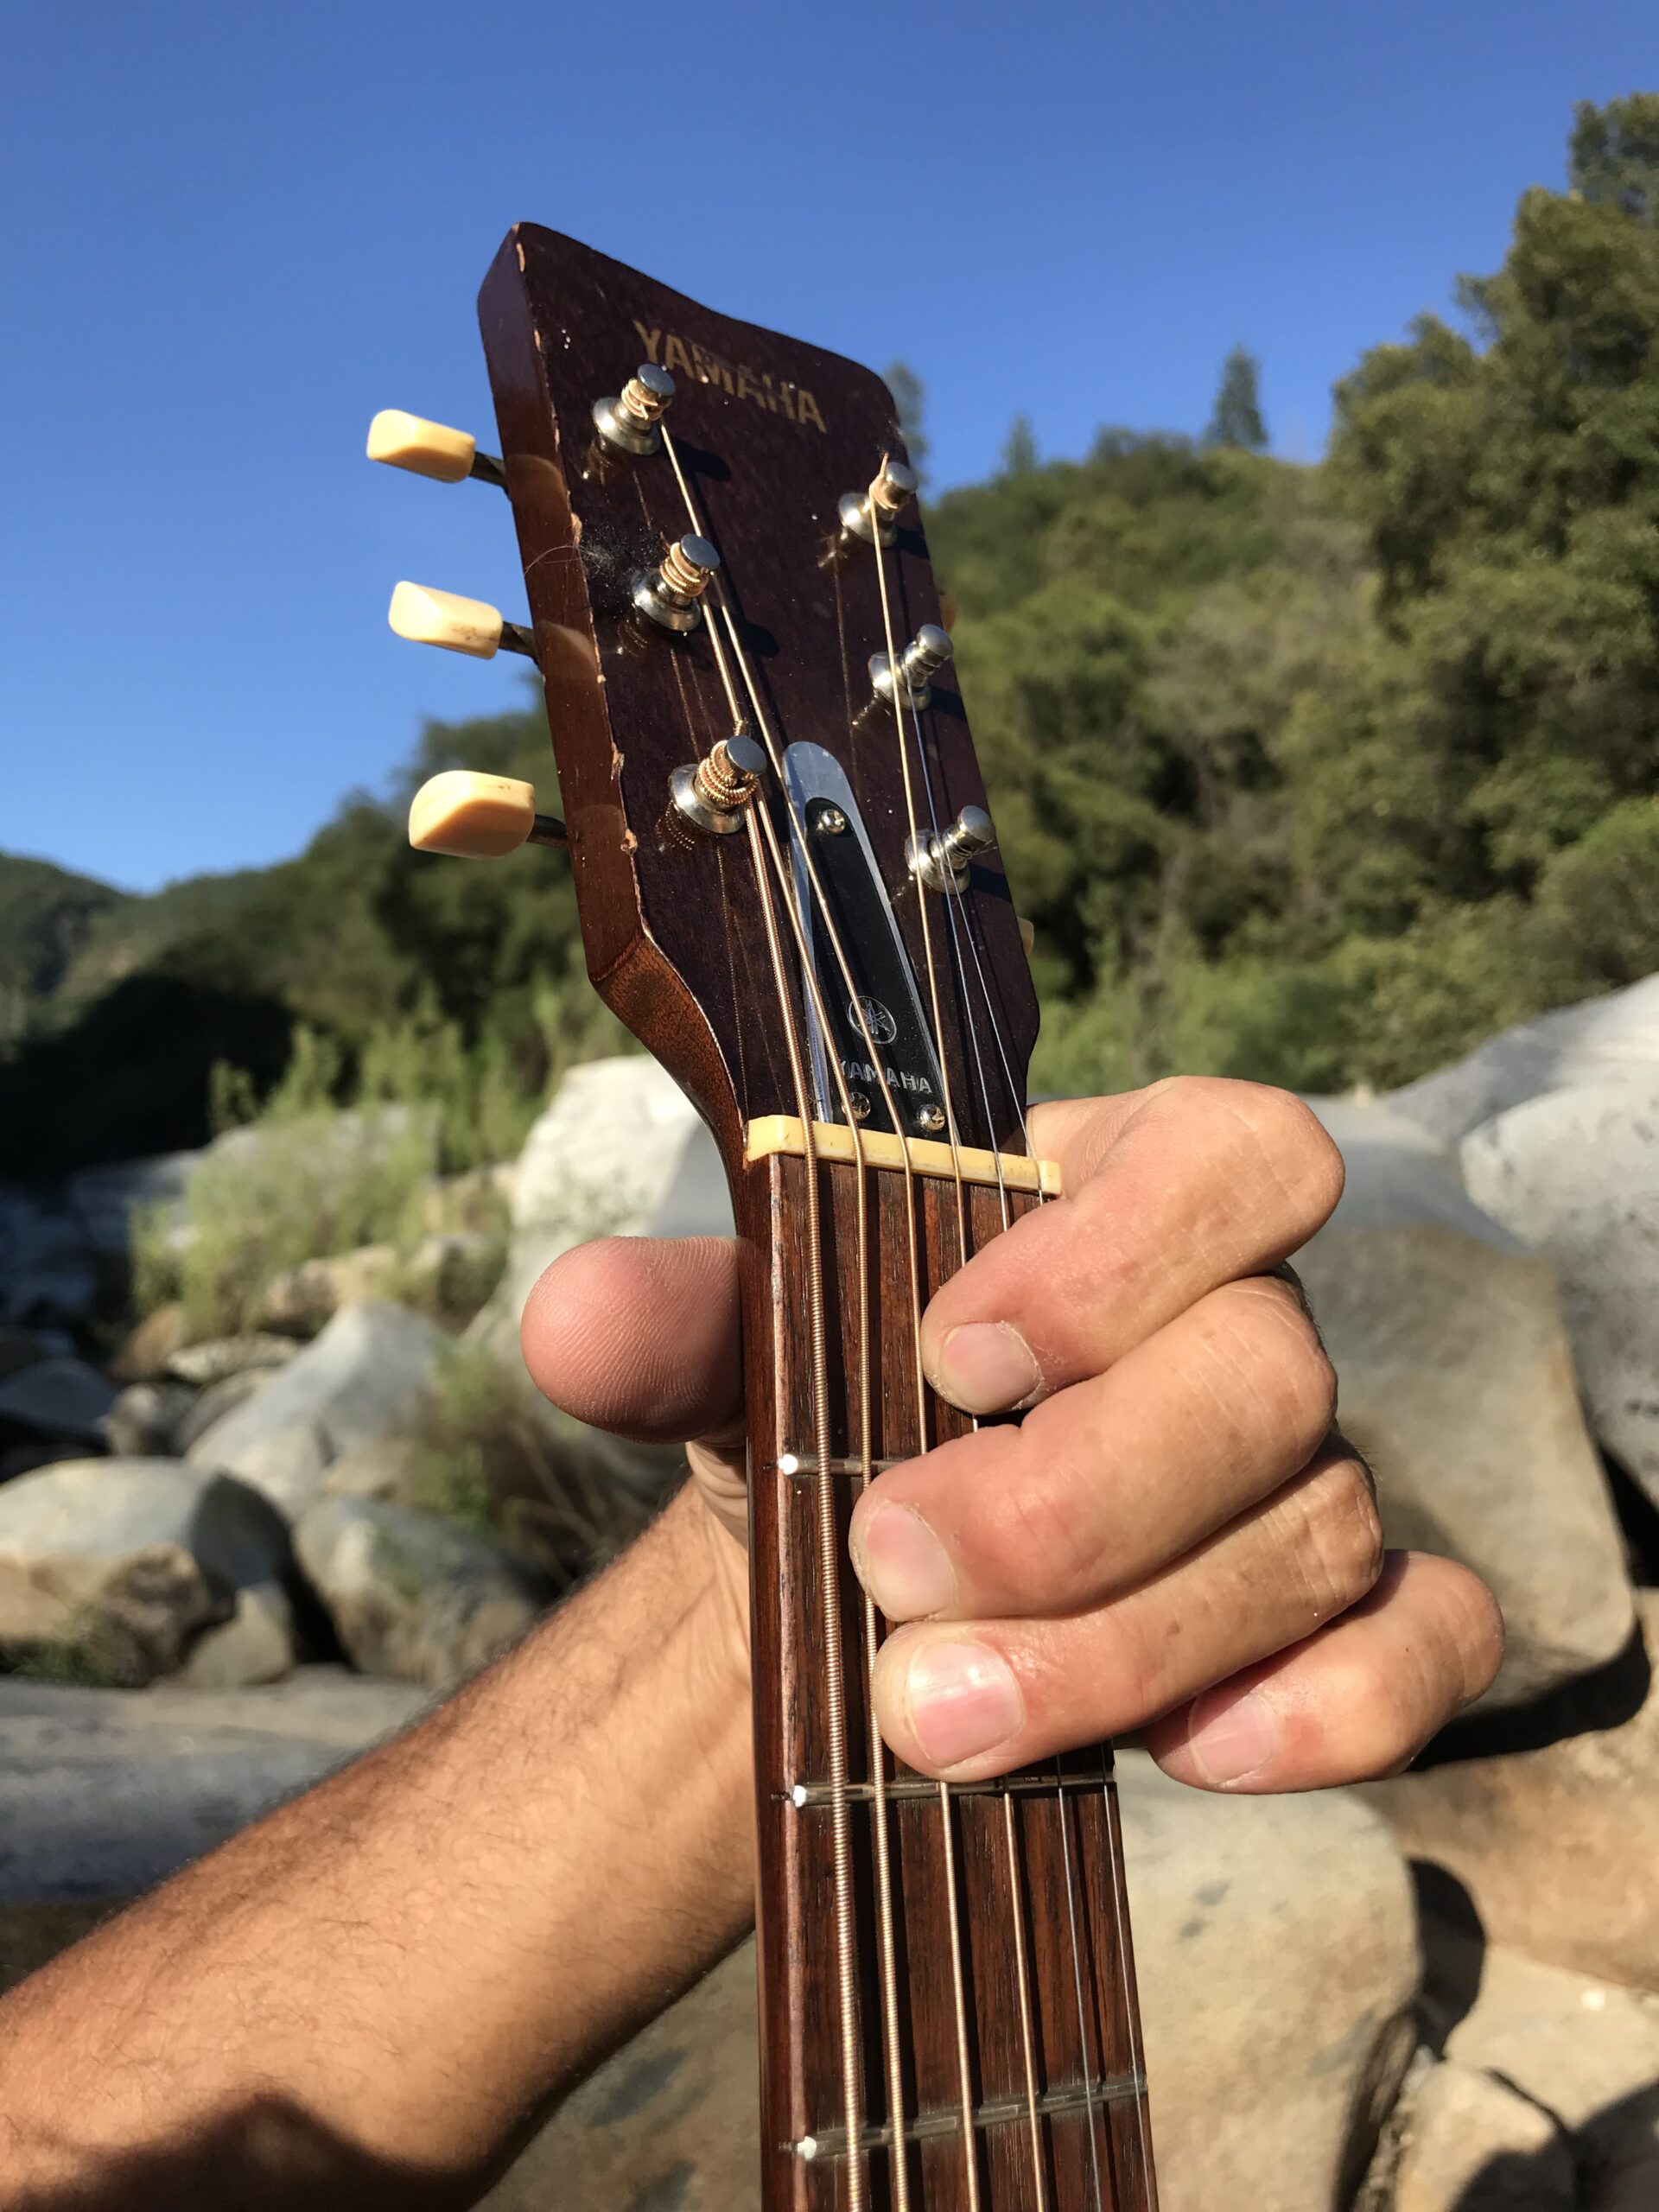
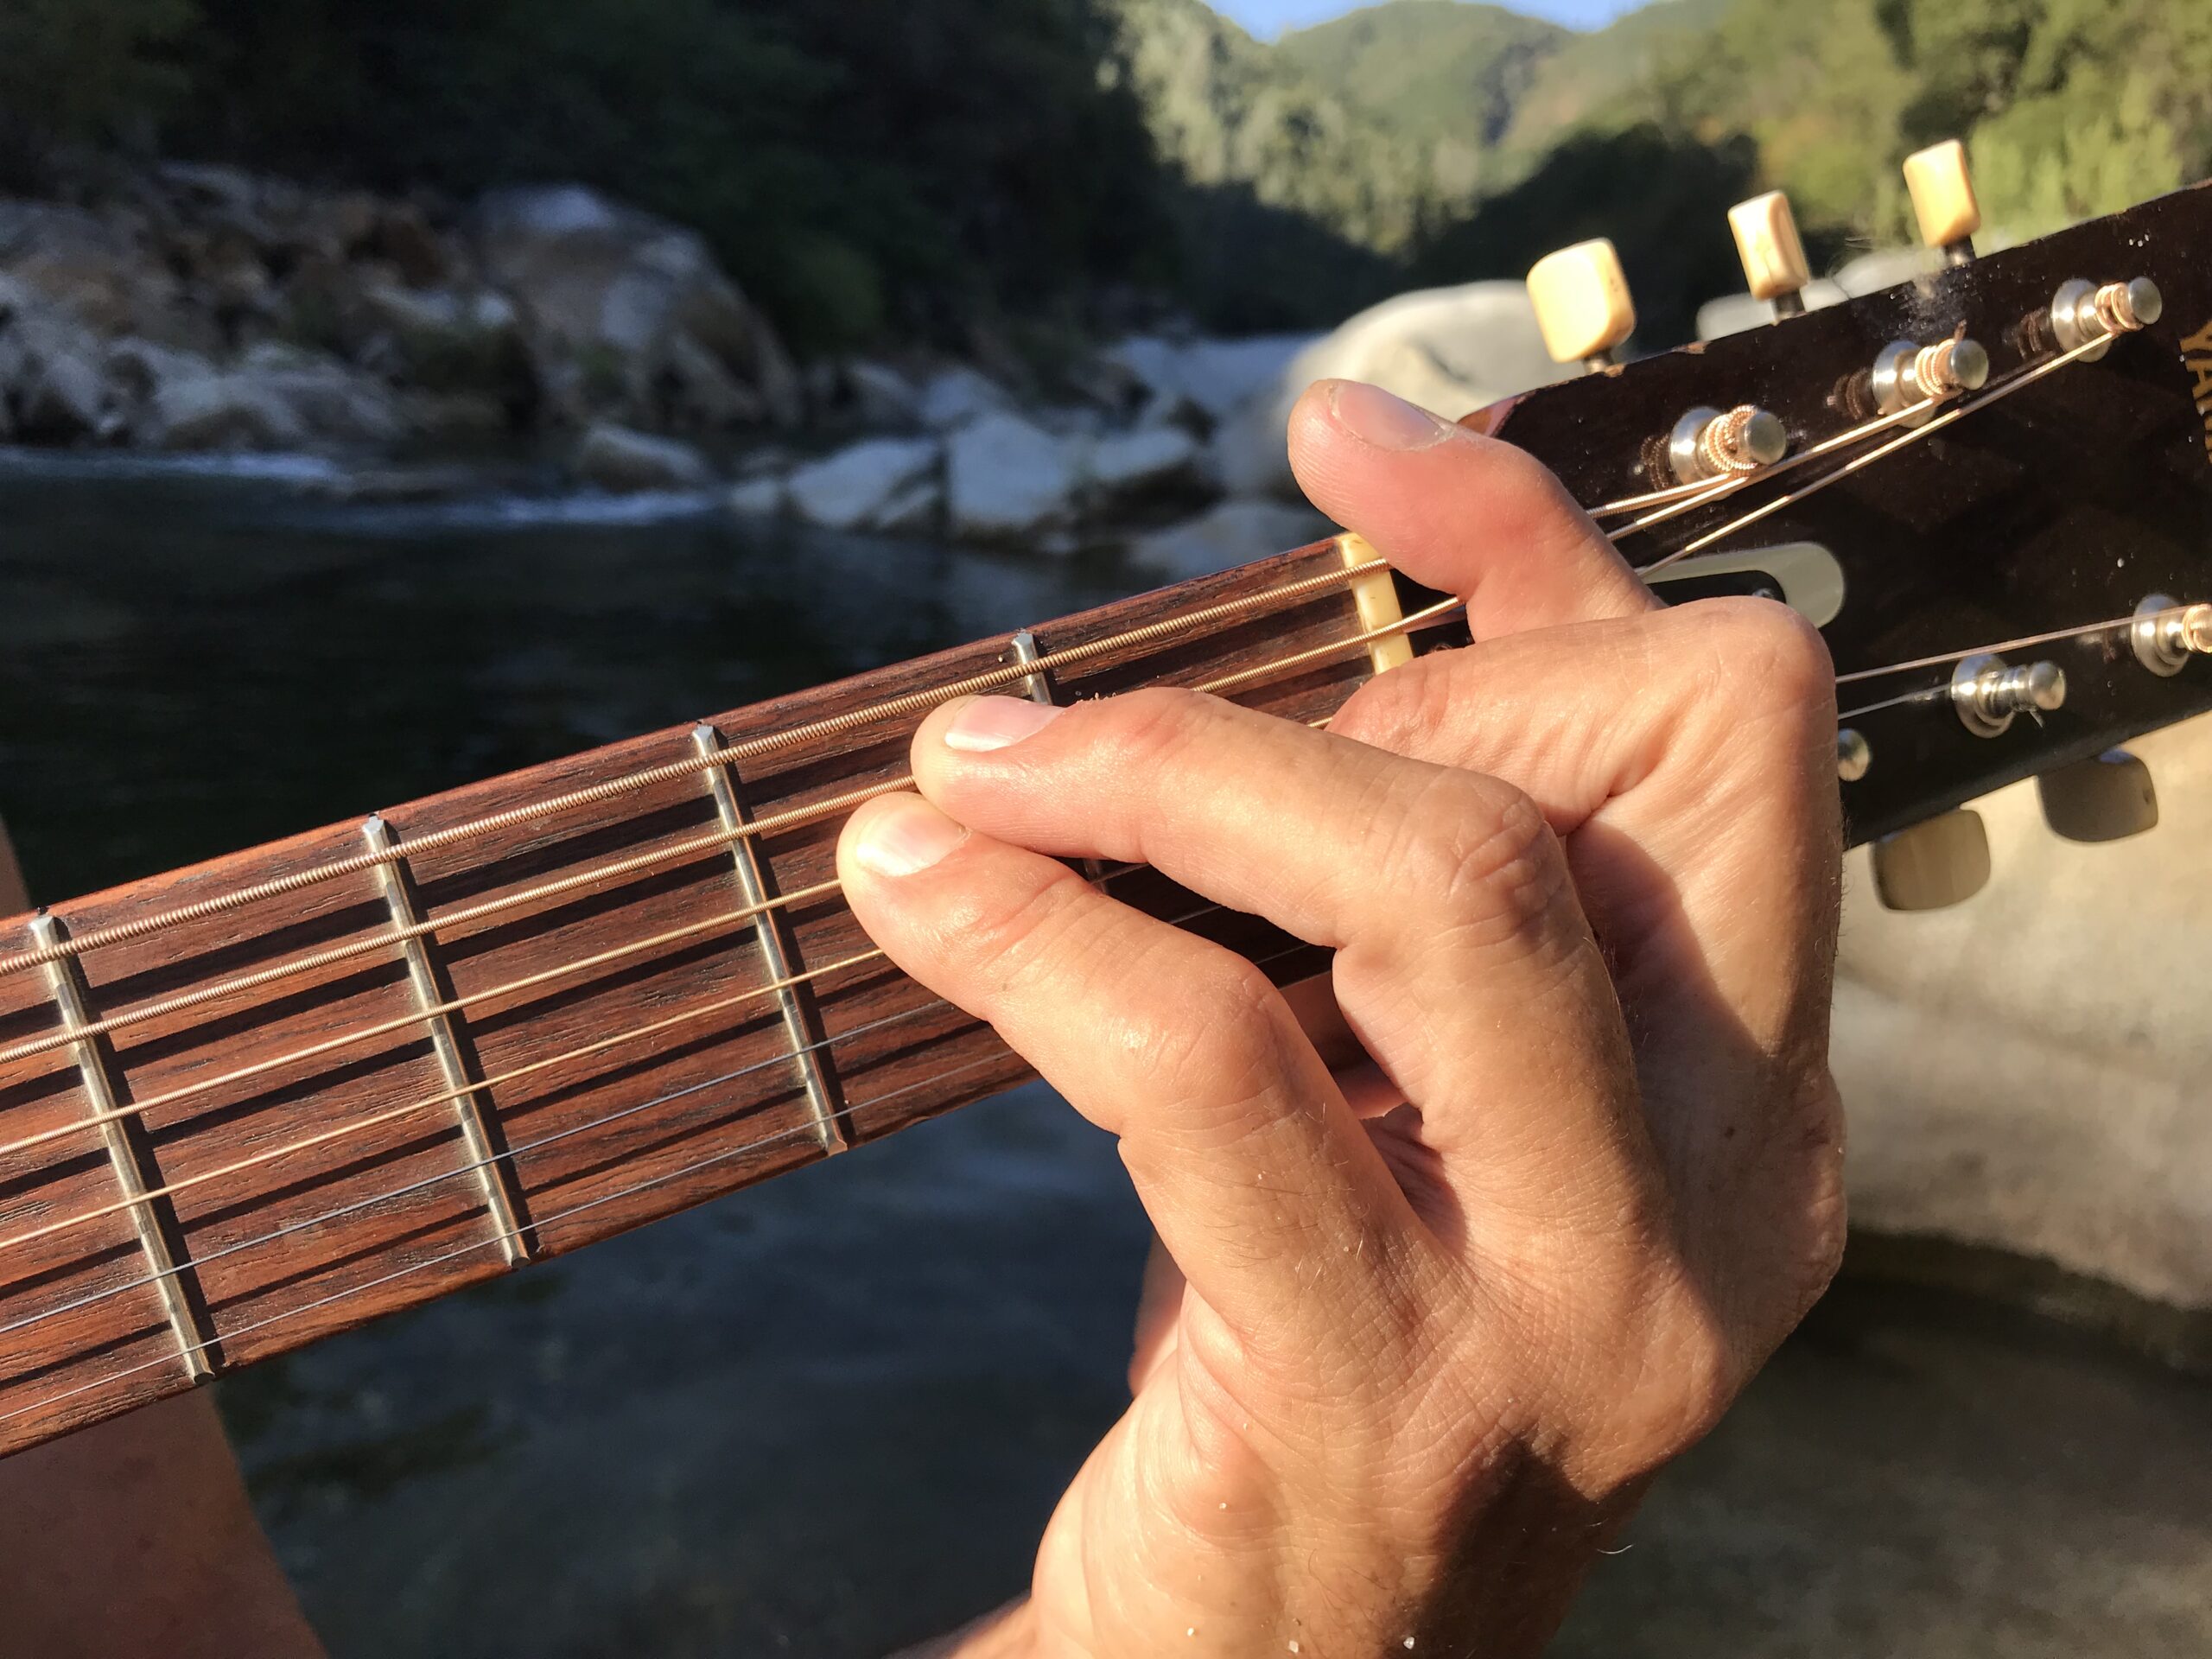
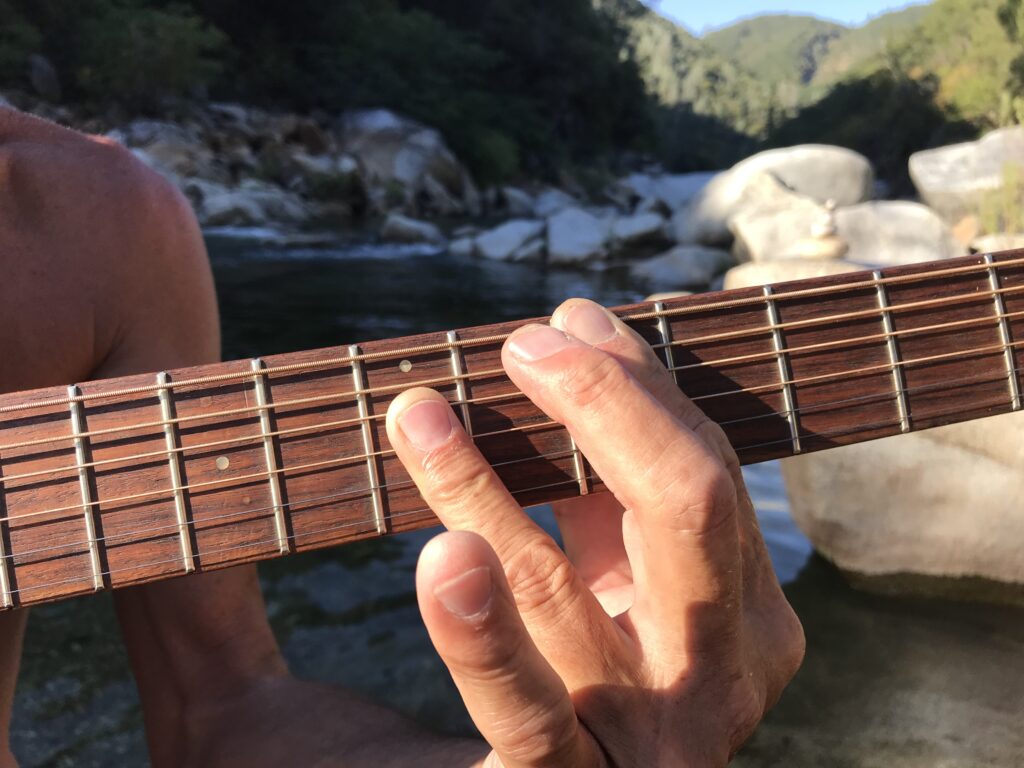
#2 The E chord using “pretenda” fret
WELCOME to Guitarluv.com Home of the 15 minute music theory lesson, the “secret chord” and so much more. I am “web site” challenged, and have an extremely hard time navigating input. I have accidentally deleted large amounts of info and it’s hard for me to stay inspired. But l feel almost a “duty” to relate my many years of self learning so the public can avoid all the pitfalls I have made. And the joy of advancement I have discovered. Video’s seem to be the way to instruct, ( and reading this will take longer) so I will be adding them eventually, sooner I hope then later. In the mean time, pics and type uggh. For the beginner to advanced, there will be something for everyone, even a non-player. Understanding some basic music theory concepts will be at the forefront, and although this (at times) may seem counterintuitive, with patience, it will be made clear. You do not even need an instrument to come to some understanding of basic music theory. For many intermediate players, and some advanced, this instruction will open the door to song writing and playing covers. I’m also interested in helping beginners and non-players alike, so some parts may be skipped over. However, I do recommend the more experienced player follow along, as you may miss an important aspect. This is NOT a traditional method. I won’t be teaching finger picking till later (and then just a few examples) if that’s the only style you’re interested in. I am more focused on flat picking, chord formation and understanding the entire neck of the guitar for song playing. Strumming and single note melody lines a.k.a. “lead”, and the basic major scale will come after this first part. I do not recommend using the thumb as a pick. (other than making sounds while learning the following theory and of course when fingerpicking). There will be a lot of information I think that will be useful for all players, and i hope to have more pages soon. How to buy a guitar, basic rhythms, etc… But right now, for the intermediate player, the following could change your entire perspective on chords/songs. So, this first part is mainly for the “frustrated” player. Those who feel they have reached a seeming stagnant level. It is designed to give you an understanding of over 50 chords in just a few minutes. Thus, opening the world of cover songs, and original creation. I can actually film the moment of “Epiphany” with (some) players, using the following explanation. It may sound like bragging, but I don’t believe this has ever been done. I also can’t bring myself to charge money for such a simple concept. However, if you do learn anything, and are in any way “grateful”, please donate anything you can for It WILL be appreciated. Maybe in the future if I get positive feedback, I will start an online “subscribe”. Till then, it’s free with no strings. So, let’s jump right into it.

THE BASICS It is important to understand a little bit of the “workings” of a guitar.
FIRST : The “Fret.” The so called “space” BETWEEN the metal bars running perpendicular to the strings, all the way up the neck. Sometimes the metal bars themselves are also called frets, but in this case, I will be referring to the spaces between them. Including, what I call the “pretenda” fret. (see picture #2) This is the space between the “tuners”, or also called “machine heads” and the “NUT”. Nut: The white plastic or bone piece that the strings first pass over after the tuners. The “Nut” actually looks and acts like a “BAR” and automatically “bars” all strings. I will explain what makes a “chord” in more depth later, but I feel making this “shape” will be an important first step, whether you have an instrument or not. One thing to think about first (if you do have an instrument), is something called the “action”. This is the distance or “Height” of the strings in relationship to the fretboard, “aka” the neck. If this distance is too high, then the making of chords can be extremely frustrating and nigh on impossible. With electric guitar, it has adjustments to bring this “height” up or down fairly easily. Acoustic is another thing. MANY used guitars have “pulled up” the strings at the Bridge: (the plastic or bone piece directly behind the sound hole, that the strings pass over after all the frets). It’s kind of like the 2nd nut. Time and age combined with the tremendous pressure of the tightened strings, can actually pull up the wood at the bridge making it VERY difficult to press the strings down with your fingers. Although nylon strings on a classical guitar can be easier under this condition, both can be so bad, that it can cause you to give up playing. See my eventual page on {How to buy a guitar} (when I post it), for a more in-depth discussion on this subject. Just know, that the following bar chords can be too difficult to make if the “action” is too high. Used guitars with bad action are one of the biggest restrictions to learning, and many a would-be player has fallen to the wayside due to this issue. There is (usually) a device called a “Truss” rod that runs through the inside of the neck, that will give you the ability to “bend” the neck. This can lower the action to a desirable point. The bolt adjustment for the “rod “is often inside the top of the sound hole, or at the headstock underneath a plate between the tuners. (often held with three small screws.) Have the guitar shop do this, as it can be tricky to get the lowest action without creating a buzzing sound. But you can do it yourself. You can turn this rod to a point where the strings will actually touch the fret bars (way too much) or create a buzz when pressing on the strings. (action not high enough). Adjust this to the point where no buzz happens no matter what fret /string you press, all the way up the neck. If it’s still really hard to press the E bar chord, then you probably have a pulled-up bridge. Get some hands-on advice from a good shop. You can probably make the standard 1st position chords on almost any guitar (as most instruction will rely on) but bar chords and lead will be difficult. Nylon strings not so much, but the neck on a classical guitar is usually pretty wide, and that could prove to be a hindrance too. I’m just telling you this so you will realize the difficulty may be due to your instrument, and not you, your hand strength or length of your fingers. It may take a while to get the bar chord to sound good, and each string clear and not muffled. Good action “low”,is a must. Here’s a comparison of the problem: In surfing, (as in guitars) most people will buy or rent a used board, thinking they will try it out before the spend the money on a new one. Used boards tend to have a number of repaired “dings.” This means water, and extra fiberglass is present making the board heavy. It is VERY difficult to catch a wave with a board in this condition, so a beginner will give up thinking it’s their fault for not being able to catch a wave or stand up. It’s the same with guitar. If your instrument has an action problem, and is hard to press, you will tend to give up. It’s true you do need to develop calluses on your fingertips eventually (especially for first position chords) but that will come later while you practice. High action just makes it all that much harder. So, my advice is to spend the money on a guitar that easily goes “in tune”and has low action. A solid top also has much better sound then a typical plywood top and is well worth the extra expense. Also, good machine heads will keep your guitar in tune. I will go into depth when I have my “how to buy a guitar” page up.
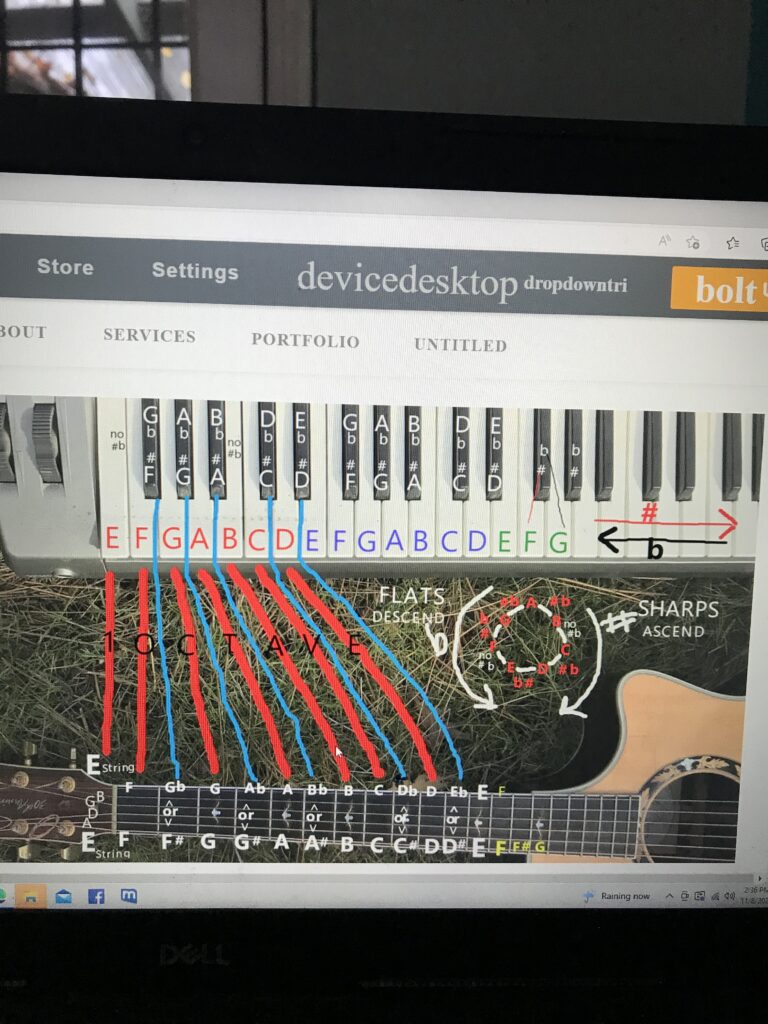
Intervals Here is a comparison of note placement between piano and guitar to review first. An interval, is comprised of 2 notes. Going from one to another in either direction is an interval. A “half” step is an interval.
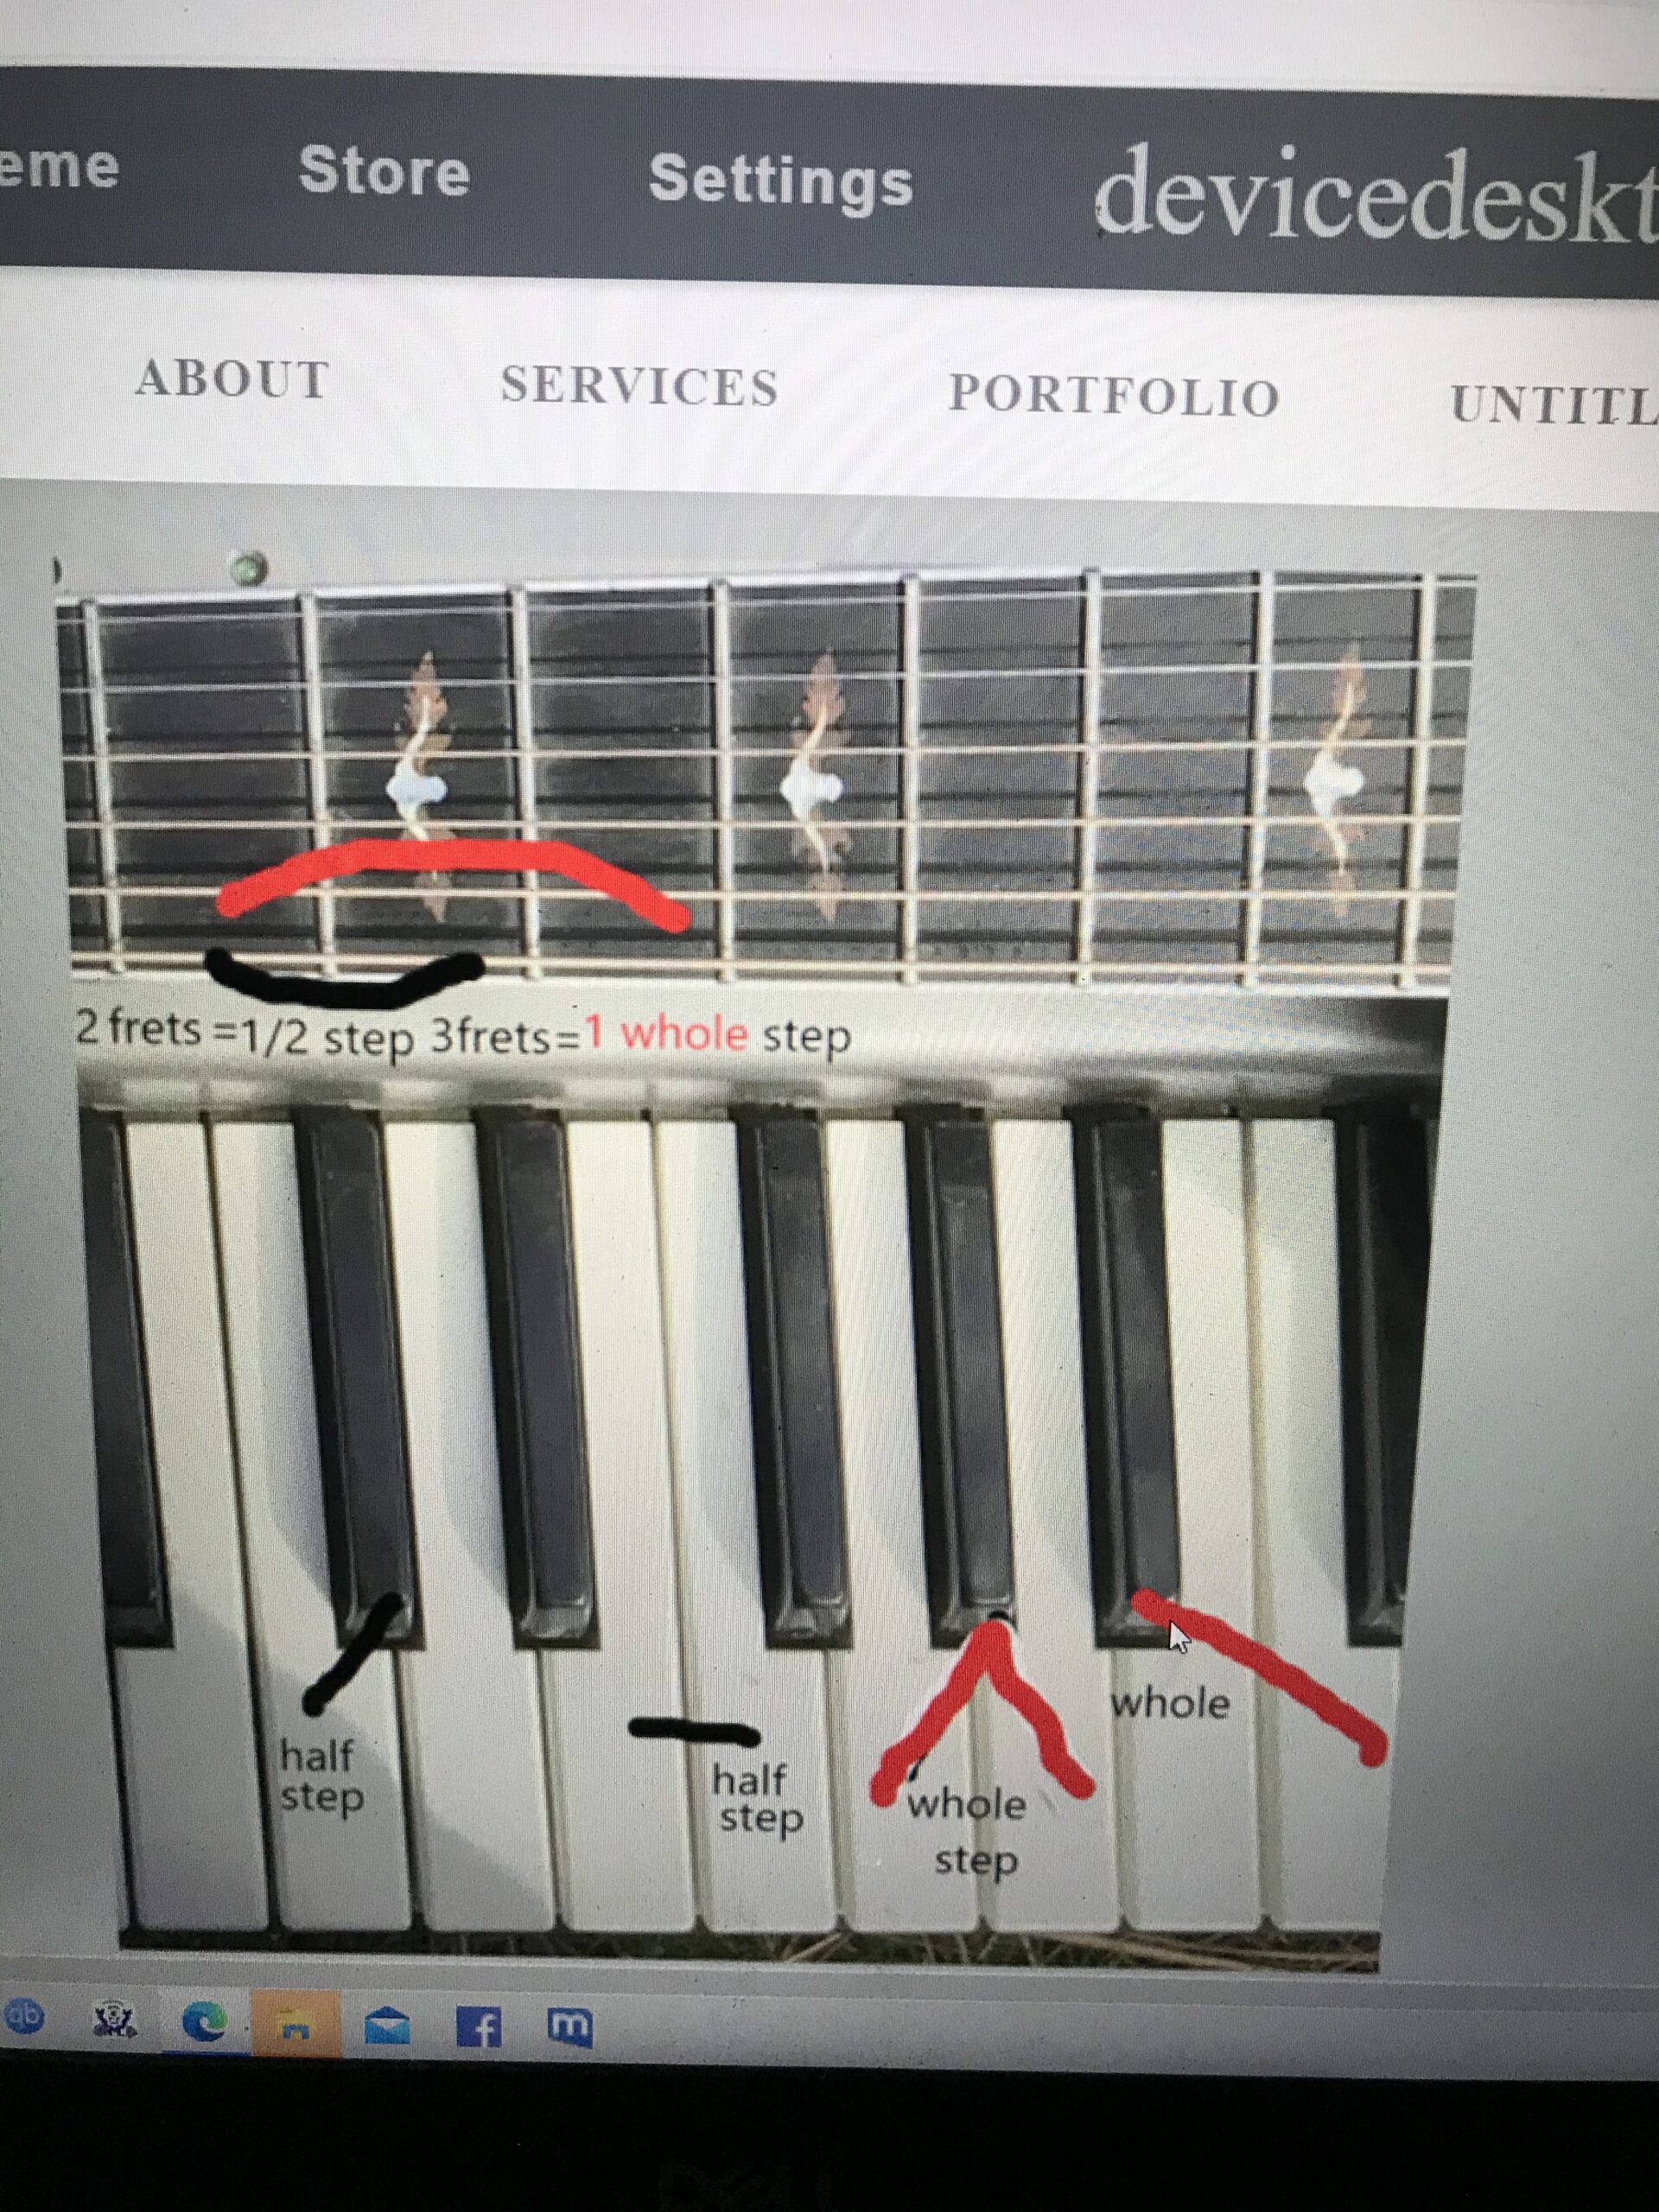

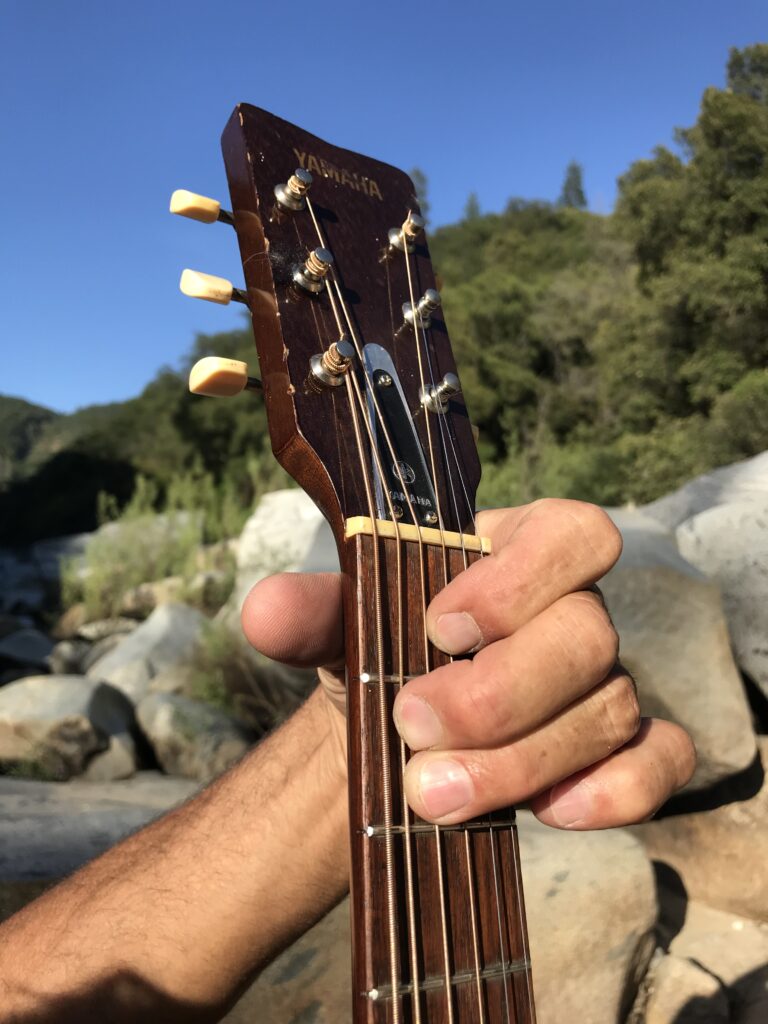
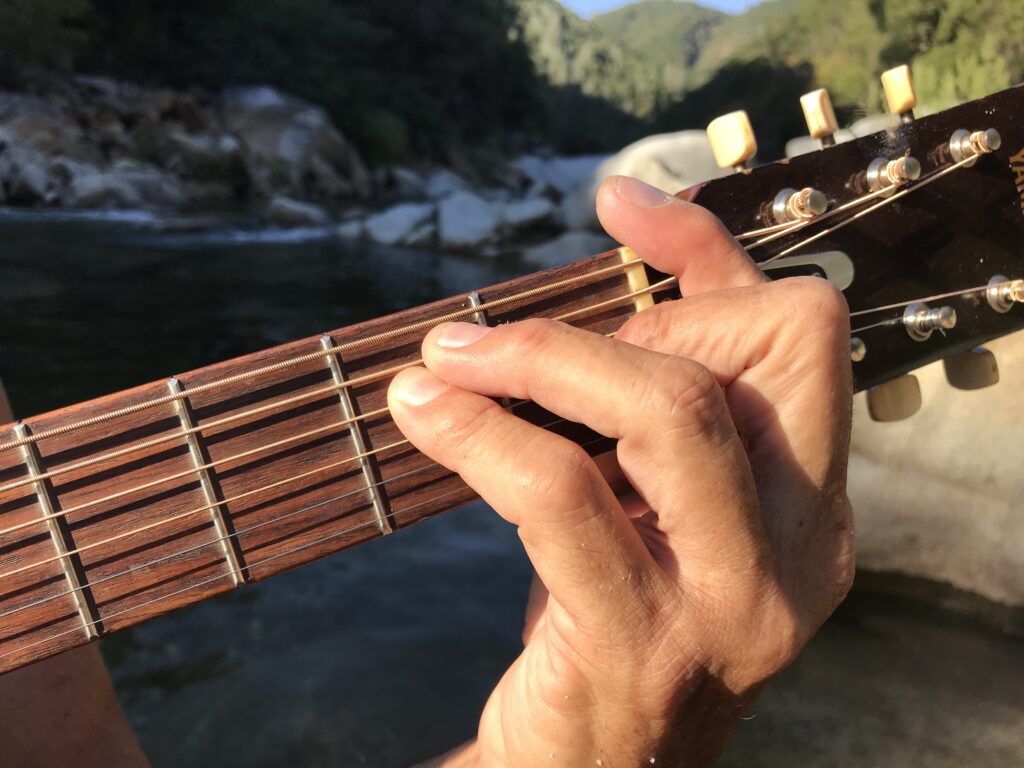
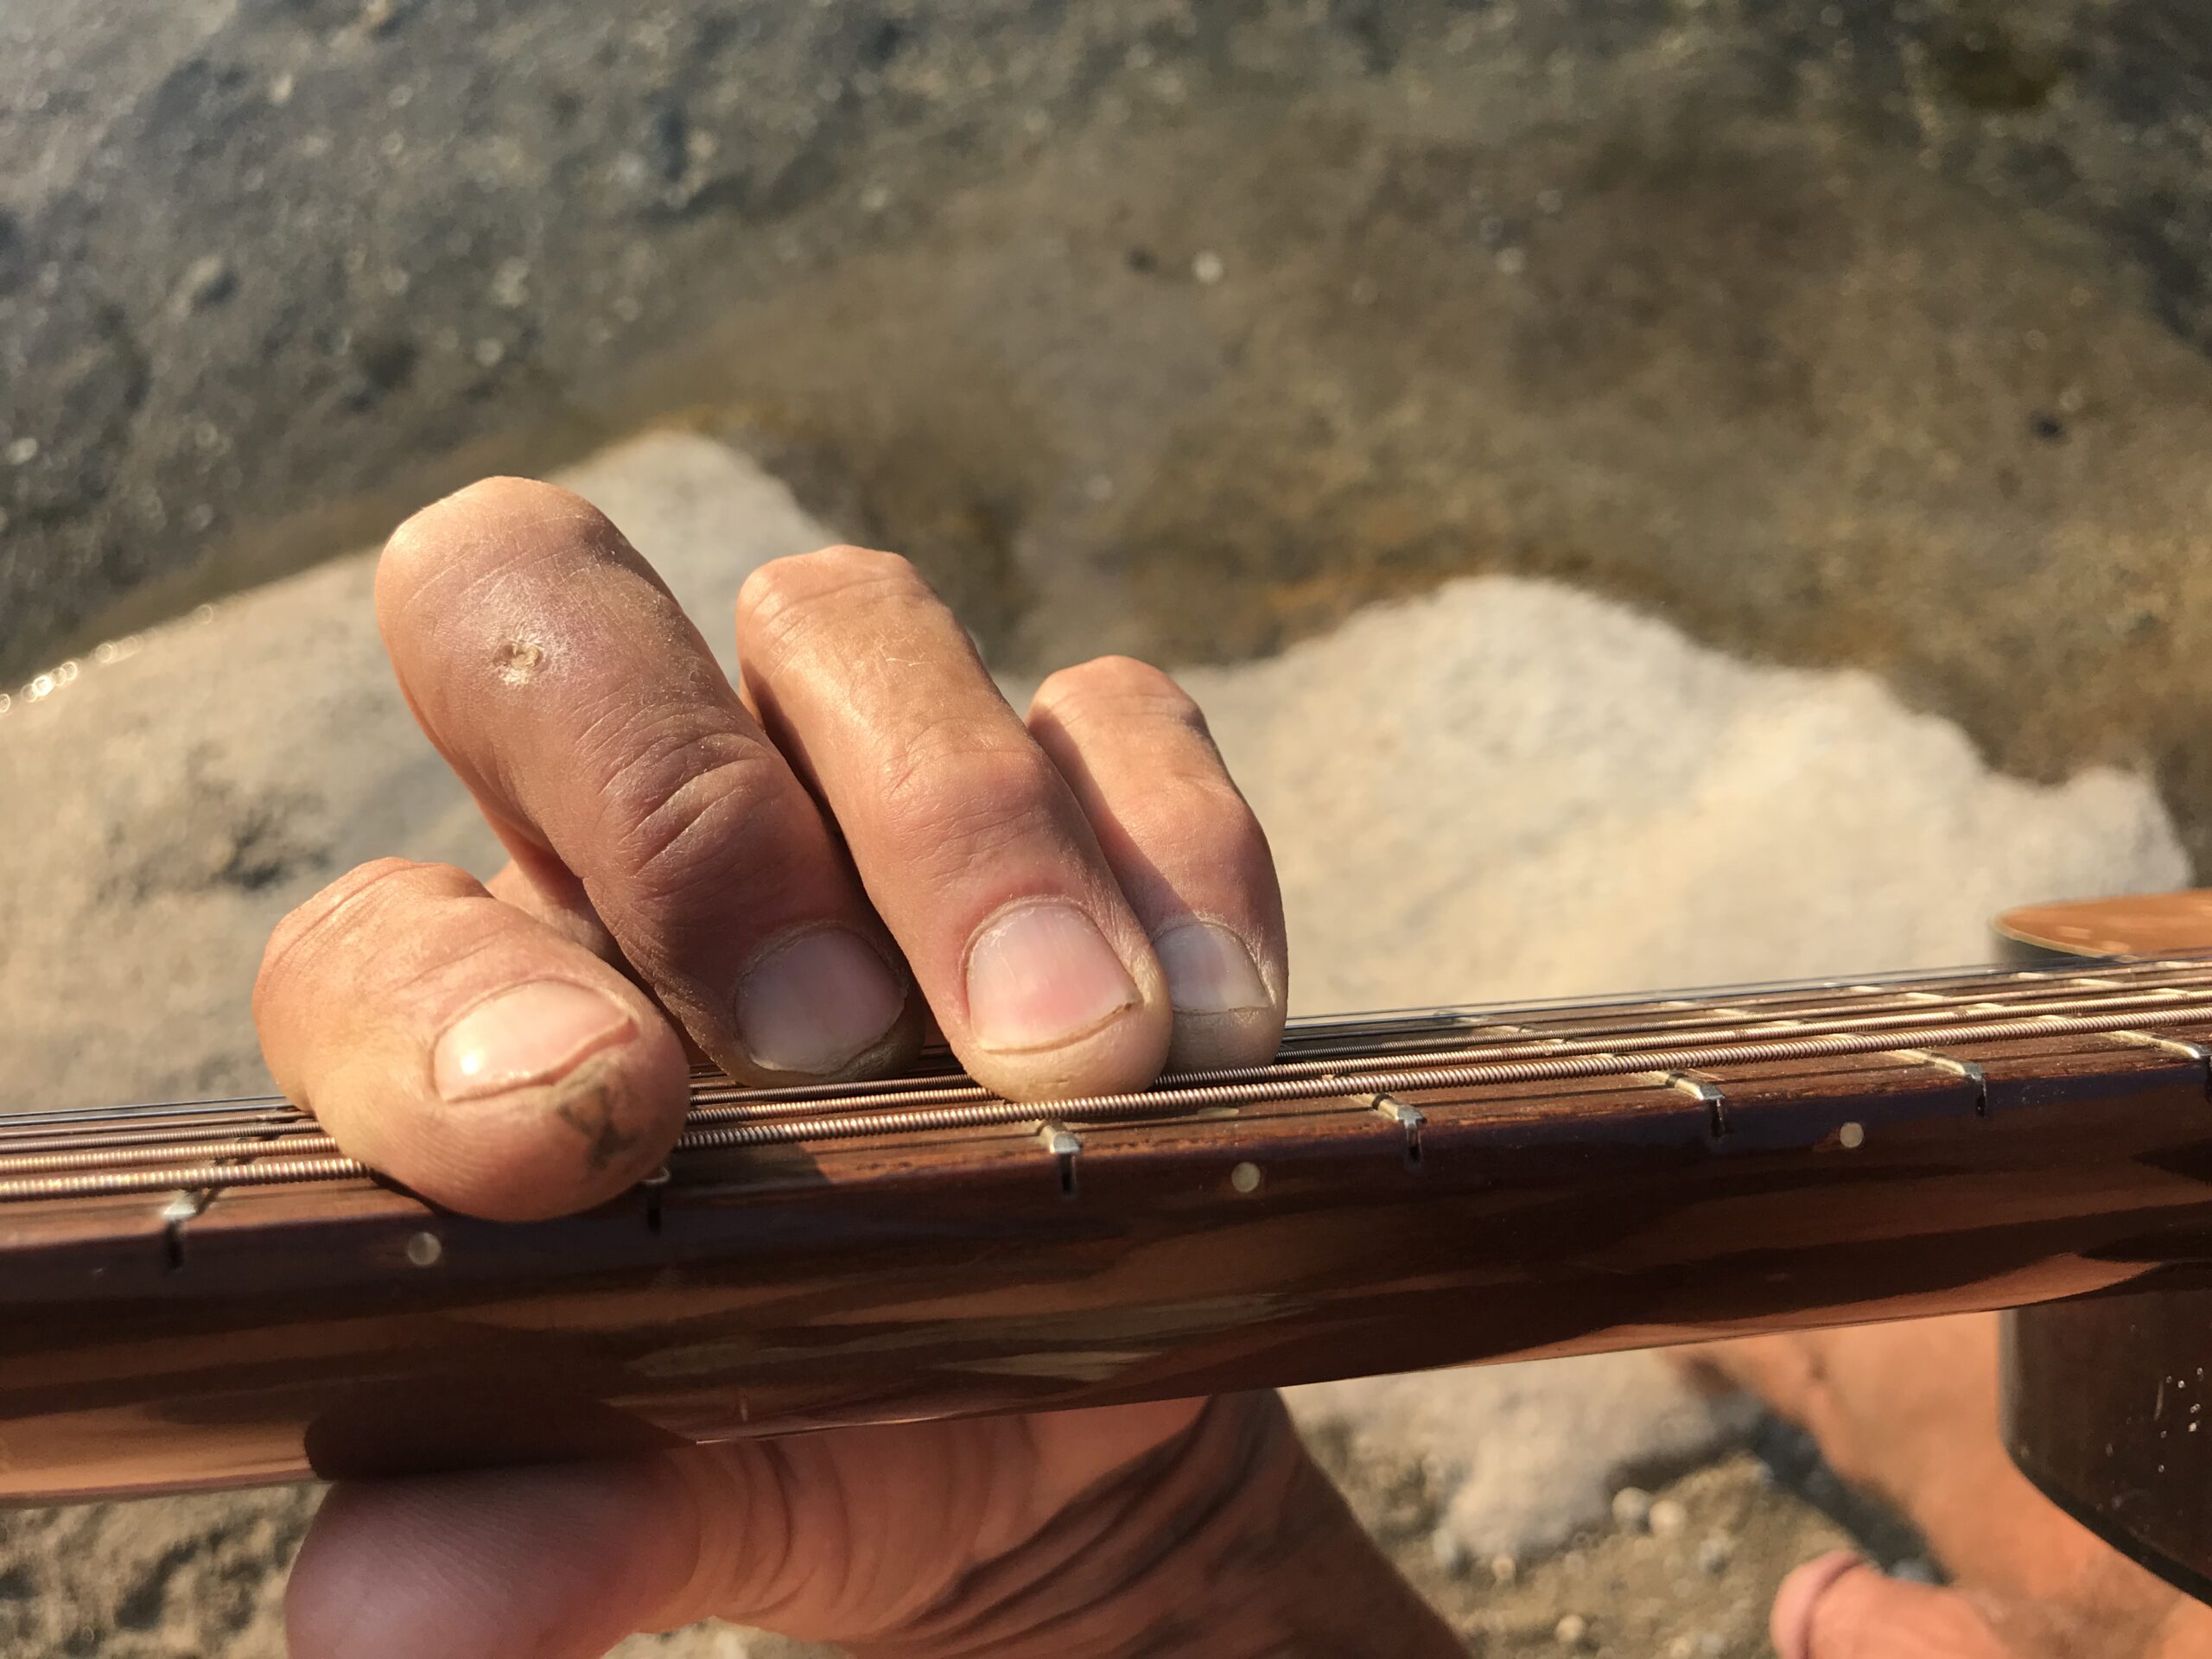
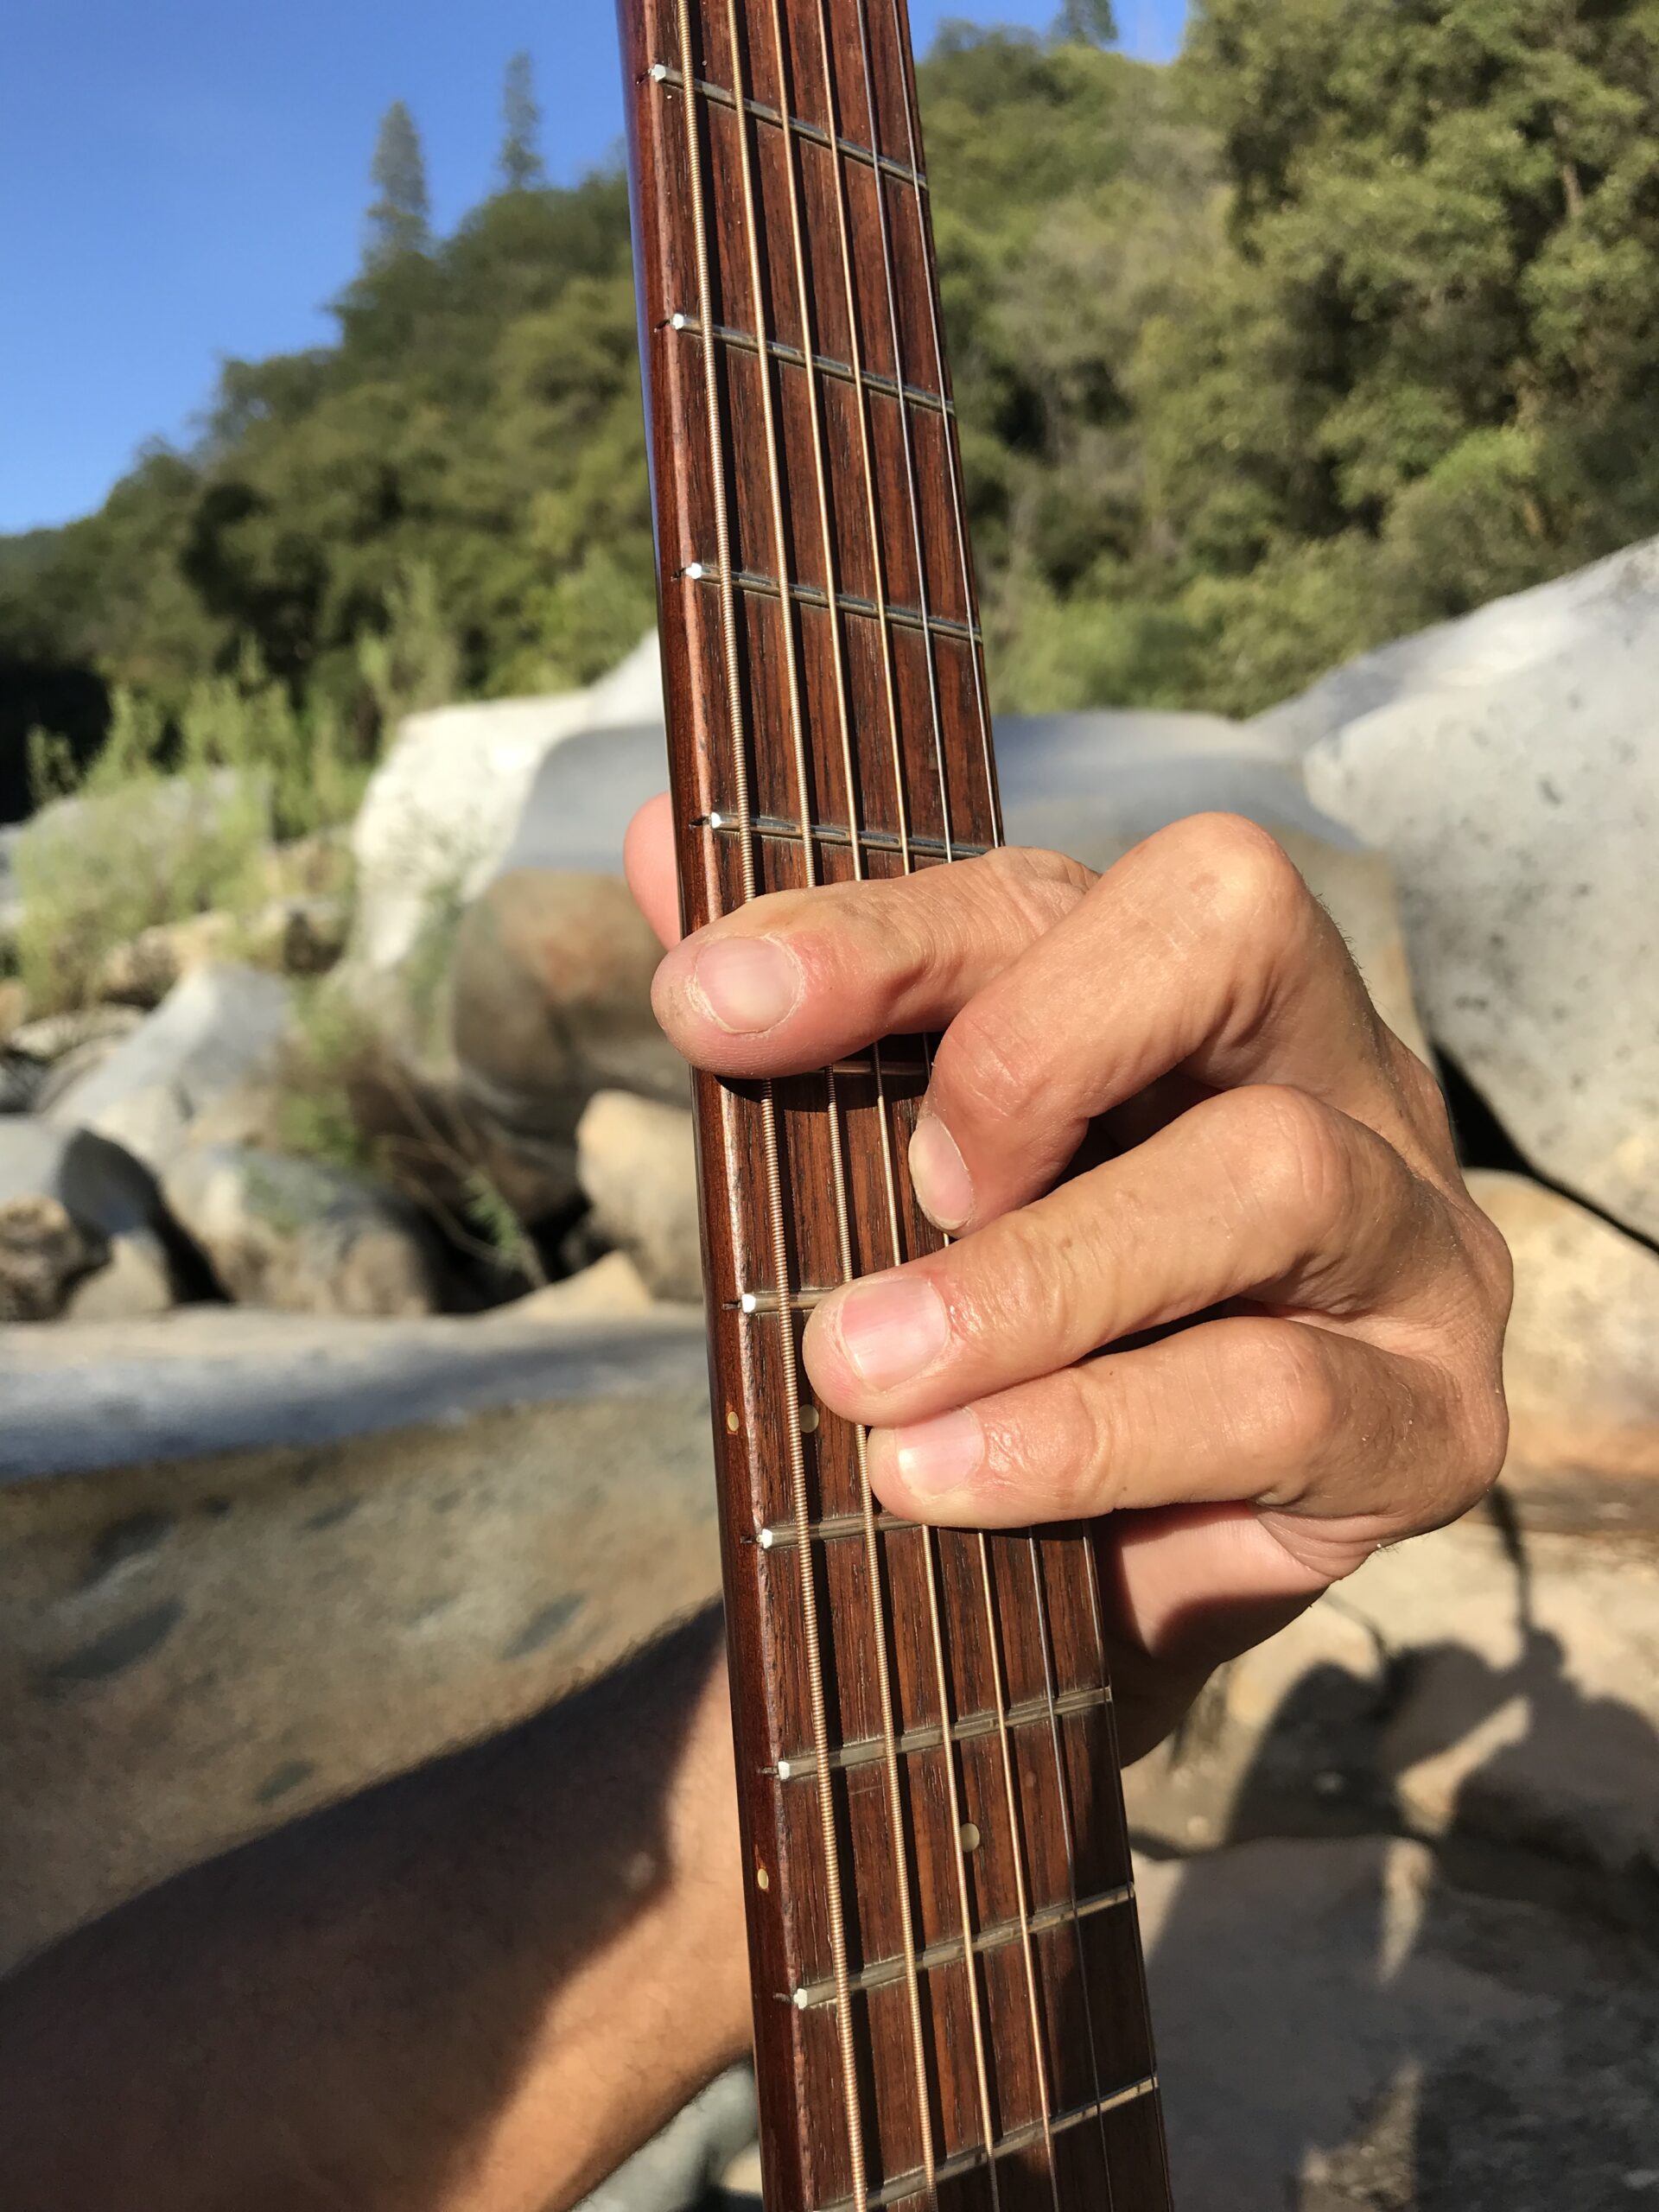
Picture #1 is what is called an “E” chord in “open”. ( As you can see, some strings are not touched by any fingers, hence the name “open”). This is why I’ve included picture #2 where I “pretend” to bar the space. (It’s not actually needed A.K.A. “Pretenda” due to the “Nut”). The “E” chord (Picture #1) is one of the most common chords you will learn in any guitar instruction. The first picture shows the standard E “major” chord WITHOUT it being “barred.” (as I have said the “nut” does this). This first picture of the E major chord is also often called “1st position”. Most instruction will show the 7 major chords in this “open” or “1st” position formation. And as I have said, it relates to some of the strings having no fingers touching them. Most instruction will show you multiple chords like this, often using the first 2 and 3 frets, to make those 7 major chords, but my method does not include these until much later. Instead, we will FIRST concentrate on learning this “E” bar formation to explain basic theory. In the first picture, the OPEN “E” chord is made with the 1st, 2nd, and 3rd fingers, and as I have said, the “nut” acts as the automatic bar. When INSTEAD, the 1st FINGER is used to “bar” (pic #2) you are now pressing on the same strings but using DIFFERENT fingers. Instead, you will be using the 2nd, 3rd, and 4th fingers to make the “E” chord, since the first finger is now used as a “bar”. So, to be clear, you are making the SAME chord, but picture #1 is in open formation, using 1st, 2nd, and 3rd fingers while picture #2 is in “Bar” formation, pressing the SAME strings, on the same 2 frets, but using 2nd,3rd, and 4th fingers. They are the same chord, just using two different formations, #1 is “open” #2 is “Barred”. Again Meaning: (1st finger or “the pointer” finger, covers all strings as shown in the 2nd picture using the “pretenda” fret above the “Nut.” This may sound redundant, but bear with me. The following pictures show this same formation, (using the pointer finger to “bar”, and this is the one I will use to explain basic theory. For future reference, the 1st finger will be called the “pointer”, the 2nd (or middle)”the bird” the 3rd “the ring” and the 4th “the pinkey”. The beauty of the “Bar” chord is that it is a “moveable” chord. Thereby, allowing you to make ALL major chords by simply holding this form together, and “moving” it into the following “frets.” It will also give you a basic understanding of music theory (as opposed to learning through the “open” chord method). “Open” chords will NOT be shown till later, which again is the “standard” method of instruction, but not mine. If you already know some open chords, then bar chords will just enhance your ability. It’s the freedom of using the entire neck of the guitar that will lead to chordal understanding. When making this E bar, keep the thumb as close to the middle of the neck as you can, and applying a “squeeze” type pressure with the finger formation. Getting a clear sound out of the strings using the “pointer” bar finger can be difficult. Don’t give up, there will be “cheater” methods I will explain later to give the desirable sound. Understanding “basic theory” at this point is the main purpose of holding this formation. A “full” chordal sound will come later with practice. The following will be an “in depth” instructional on understanding music theory using the “3” bar chords. I will show you how to make them, and how to understand the entire neck of the guitar using them. But for now, we will only be using this one E “Bar” formation and saving the other two bar formations for later. Do NOT be afraid of your finger size or wrist pain if this is an issue. It is much easier than you would think. As I said, I will be showing you shortcuts, that will replace the sometimes-difficult hand formation of the “bar” chords. There are ways around the wrist pain, and again, finger length does not matter. (no matter what you may have previously believed). In fact, the shortcuts will also help with melody lines in playing and understanding “lead” guitar. (where the real fun is at). This will become clear later. Once you have an understanding, and comprehension, of how the 3 bar chords work in conjunction with each “mastering” the neck awaits you. Especially for you intermediate players. “Basic” theory only needs this one “E” bar chord formation to have a successful understanding, WITHOUT you even being able to make it. And later, how to sing/play melody lines OUT of your fingers, which to me, is the ultimate joy, and the main reason I’m doing this instructional. To do this, we must First understand some “basics.” Here is a visual of what I call the “circle of ones.”  There are only 7 letters used in theory, A-G there is no letter H. And in between these letters are what are called “#” sharps and “b” flats.. Now, I will explain how it relates to an instrument. (review the instrument comparison) When you move from one letter to another as in A to A#. Or A to Ab. This is referred to as a HALF STEP. In either direction. Or 2 notes total. When you move 3 notes total, as in A to A# to Bb, it is referred to as a WHOLE STEP. (see pic) Moving in a “forward” to the right, up the neck, or clockwise direction, the space between each letter is now called a sharp. And when going counterclockwise “reverse” left, or down the space is called a flat. If you will notice, there are NO #’s, or b’s between the letters E and F or B and C. That’s the RULE. Therefore, Be “sharp” and realize THERE IS NO SUCH THING. Nor is there ever a C flat. This holds true for the space between the letters E and F also. NO E sharp and NO F flat. ALL other letters DO have 1 sharp and 1 flat each. So in conclusion, here are all the letters or single “notes” in basic theory. Ab then A then A# that’s 3 total, a Bb then B that’s 2 total. (NO B#) C then C# that’s 2 total.(NO Cb) Db then D then D# 3 total. Eb then E that’s 2 total.(NO E#) F then F# that’s 2 total. (NO Fb) Gb then G then G# 3 total. Review the pic of circle of ones and instrument comparison if that’s confusing. Next up : the beauty of the “movable” bar chord. First, here are the other two Bar chords
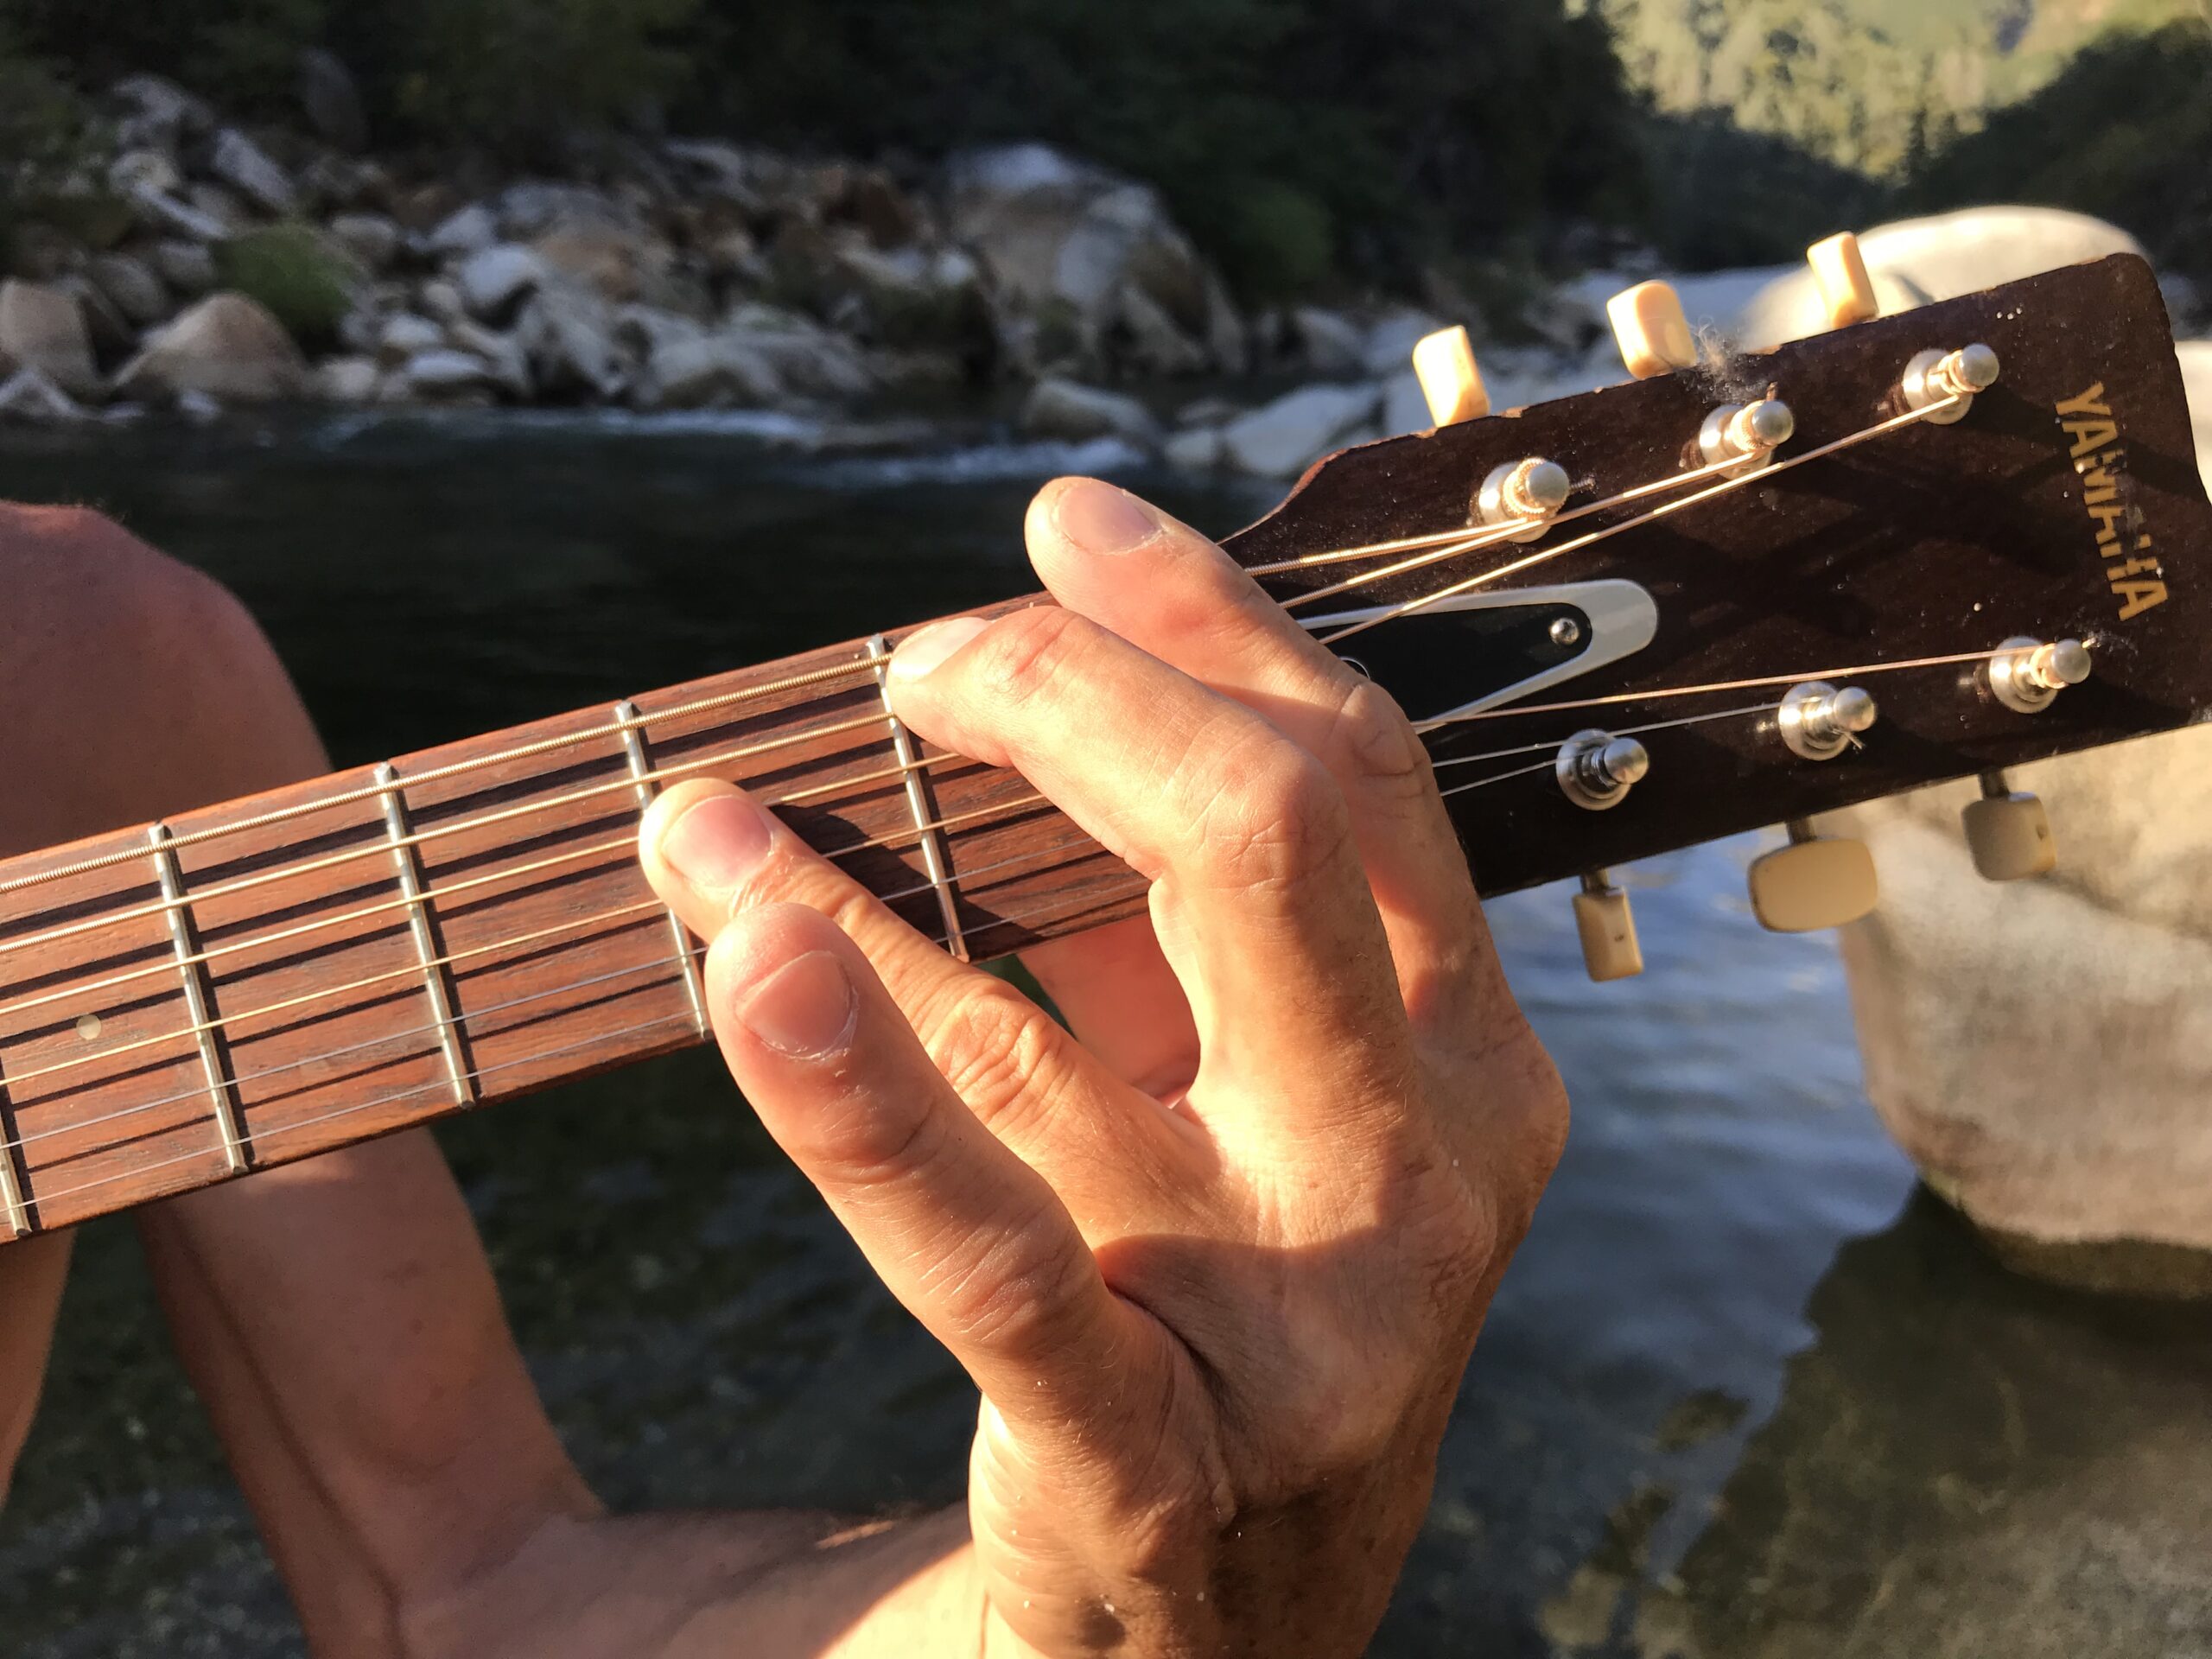
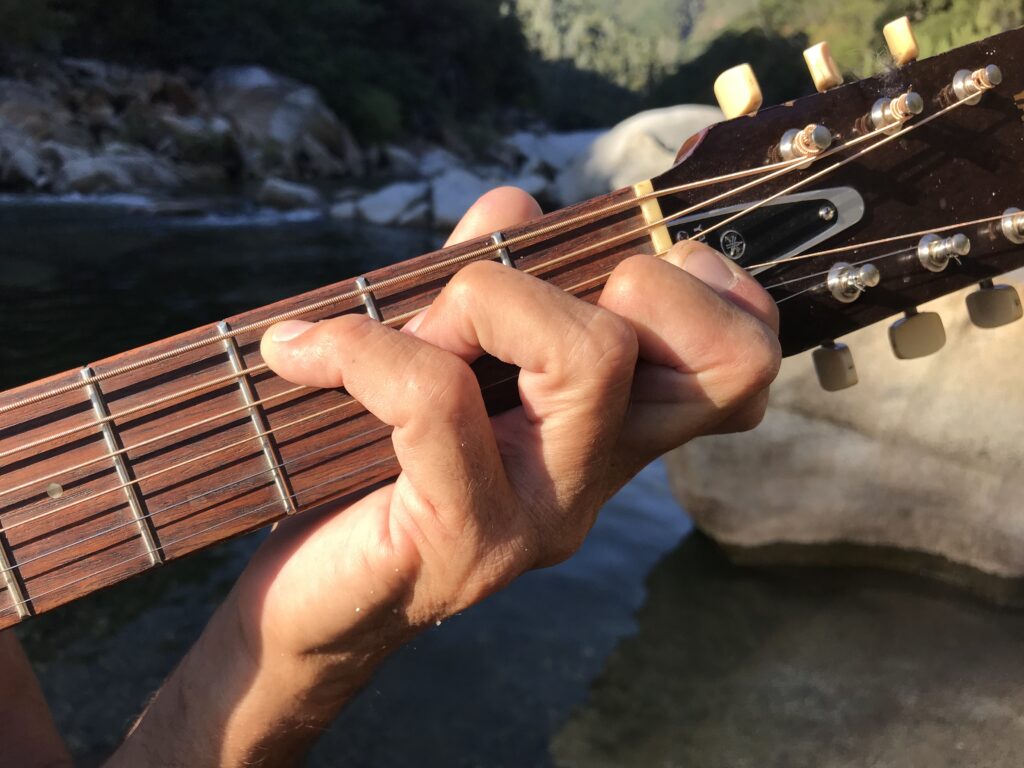
A using the “pretendafret”
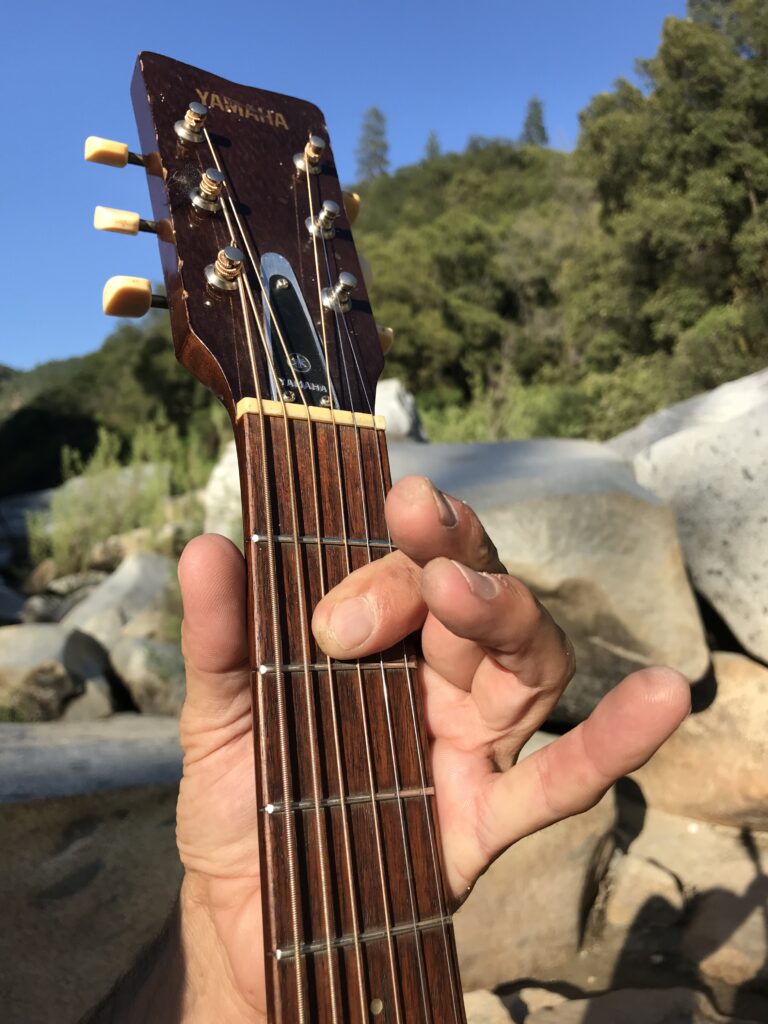
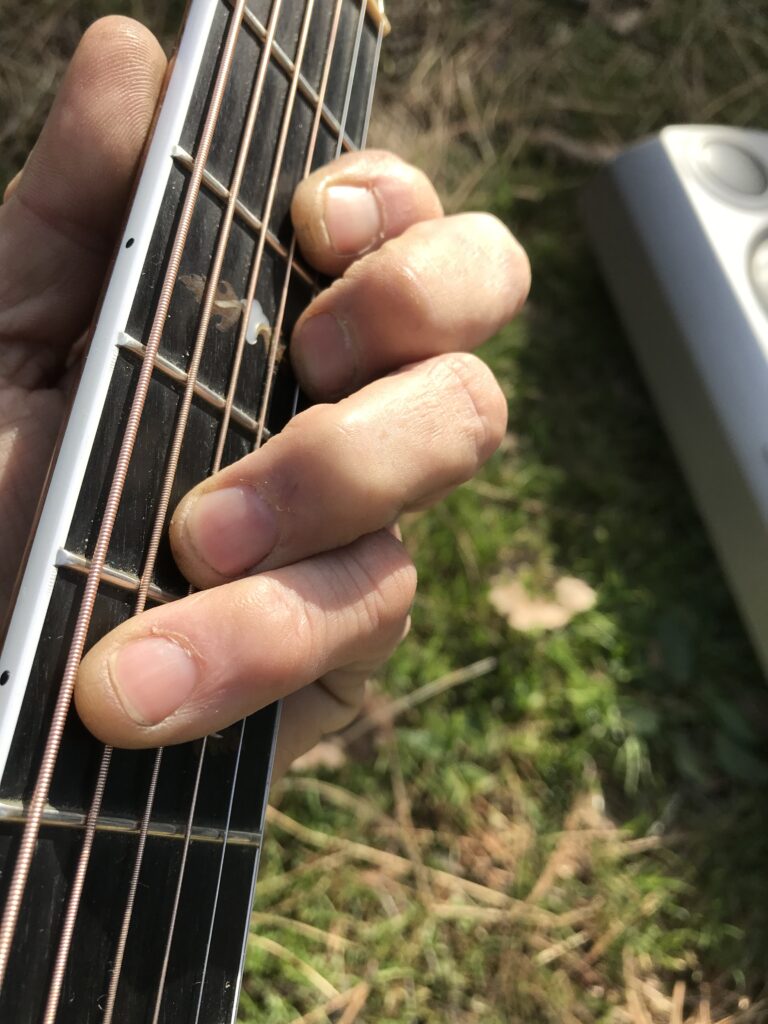
C using the “pretendafret” (this is the “secret” chord)
It is the 3rd bar chord you MUST learn! For some reason it is not taught as a bar chord (probably because it is only a “partial” bar). But it is the most important. I have seen it in the “caged” lessons (each letter represents the chord) but this is NOT my lesson. You Only need these 3 shapes. (as far as I’m concerned, the g and d are redundant). In fact, the common “d” chord is just the C bar chord moved up two frets.
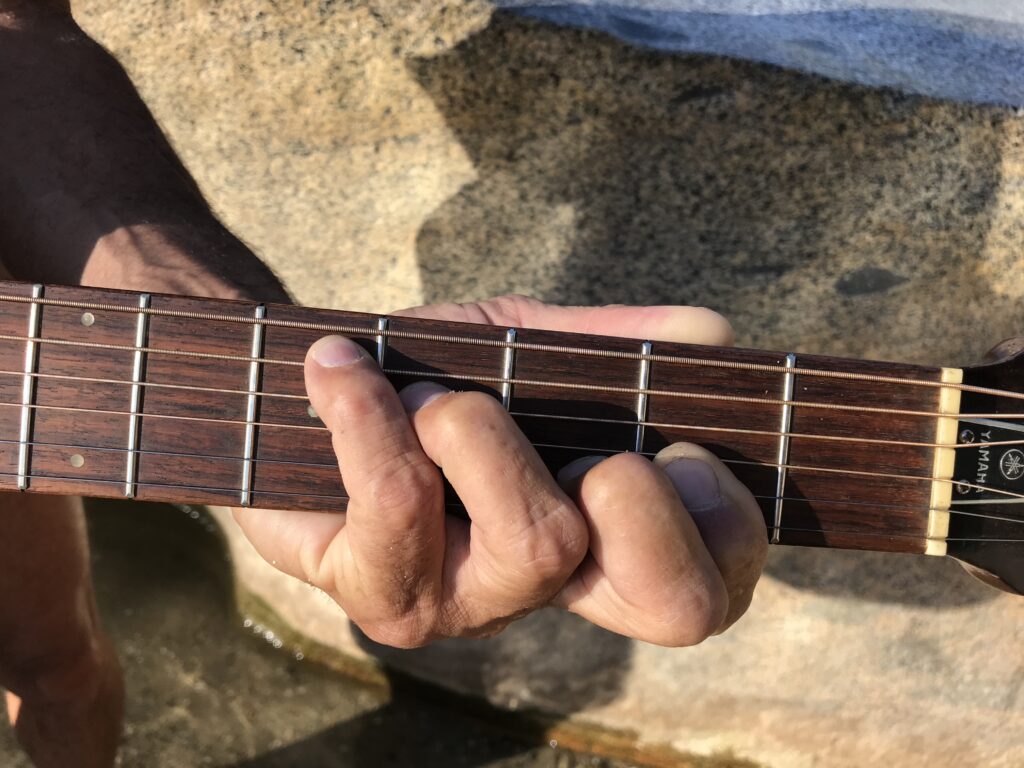
This is the True D chord, the pinkie is on the d note
When using all 3 bar chords in conjunction, ( including the “cheat” shapes I will show you, the entire neck of the guitar will be at your command. First the E bar chord.
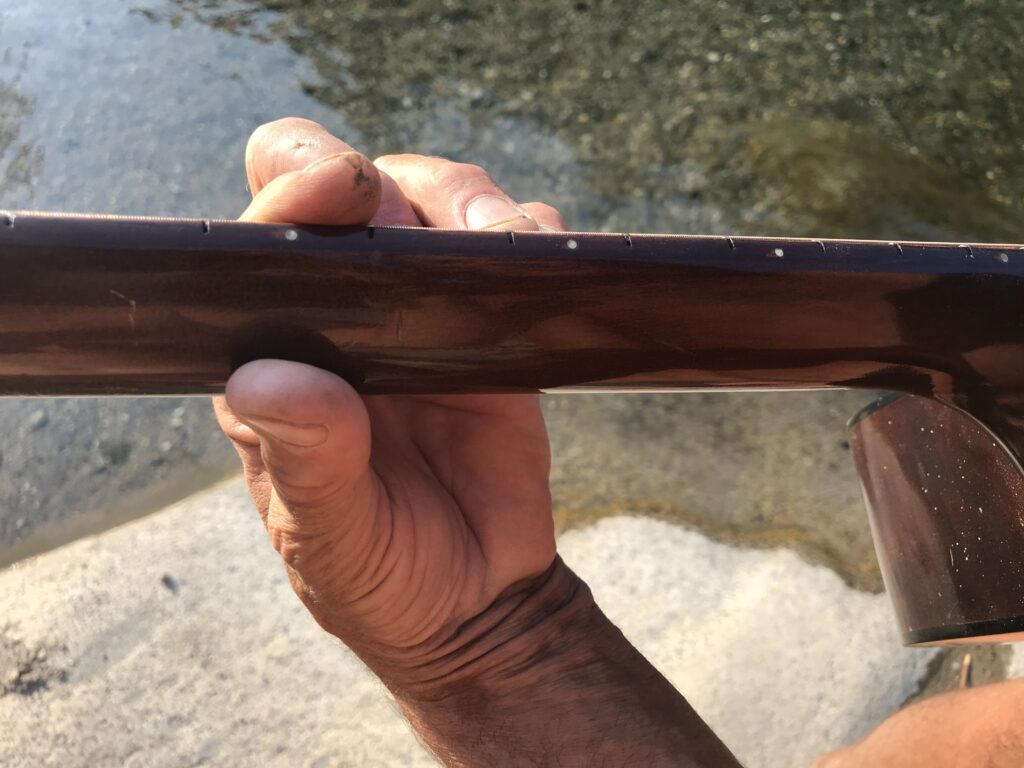
Now that you can see (or make) the E bar chord in the “Preteda” formation. It’s simple to make all the major chords by following the previous information i.e. the notes i explained. When holding the “Bar” chord The pointer finger ends on the E or thickest string in the “pretenda” fret formation. ( I will have a page on tuning too). Now, using the “pretenda” fret formation, hold this formation together, and simultaneously move everything up 1 fret. You will now have made an F chord the pointer being on the F note. This also holds true for the thinnest string as it is also tuned to E). ( don’t forget the rule, there is no E# ) From F (which is the first “real” fret) move again up 1 fret (or the second fret) and you will have an F# chord. (and F# note) etc…. Once more, 1 fret up and you will have a G chord. Then up 1 fret you have G#, then up 1 fret you have A then up 1 fret you have A# then up 1 fret you have B then up 1 fret you have C (no B#) then up 1 fret you have C# then up 1 fret you have D then up 1 fret you have D# then finally, up 1 more fret and you have E AGAIN. At this point you will have completed an entire “octave”. (With electric guitar you have enough frets to make another entire octave). Once you complete this “first” octave, MOST guitars will have 2 inlayed dots on this fret. This is to show you that you have reached the beginning of the next octave. And you should be on the 12th fret. ( it sounds exactly like the “pretenda” fret chord but much higher). [ On a cutaway guitar, this 2nd E bar chord is easy to make, but many acoustic guitars don’t have this option. Therefore, it will be difficult to make this 2nd E bar chord. Don’t worry though, once you learn the other two bar chord formations, you’ll realize your regular acoustic is fine. There are many ways to make an E chord besides 1st position, or like you started, on the “pretenda” fret. If your thinking of getting a guitar, I do recommend a cutaway.] Back to where we left off, the 2nd “double dot ” 12th fret E formation bar chord. I know this will sound confusing, but if you now go in reverse, left, down the neck, ALL THE sharp’s # you just made NOW BECOME flats b. So, working your way back down from the 12th fret double dot E holding your formation together go down1 fret to Eb. Down 1 more fret is D. So in review, what was D# moving up, has now become Eb moving down. So the SAME CHORD HAS 2 NAMES! No wonder theory can be confusing. Now, continue down from D 1 fret, you have Db. (formally called C#) Down 1 fret you have C. Down 1 fret you have B (no #or b) down 1 fret you have Bb. Down I fret you have A. Down 1 fret you have Ab. Down 1 fret you have G. Down 1 fret you have Gb. Down 1 fret you have F. And finally, down 1 fret to the”pretenda” fret and you have E where we started. Remember, (no Fb or E#) That’s a total of 7 Major chords, 5 #sharp chords and 5 flatted chords. Yes, even though the sharps# and the flats b are the same chord, they get their own name, for a grand total of 17 chords.
Now here is the magic. When in this E formation, no matter which one of the 17 chords you make, EVERYTIME you lift the middle finger (the bird) it becomes a MINOR chord. (or a minor offence ). Ha! If it sounds “sad” then you did it correctly. That’s ANOTHER 17 chords! For a total of 34 individual chords. Now, put the “bird” back down and this time lift the “pinkie”. NOW you have made a 7th CHORD. ( if it sounds kinda “ragtime” you did it correctly. That’s another 17, for a total of 51 individual chords. NOW, lift both the “bird” and the “pinkie” at THE SAME TIME and you will have made a Minor 7th chord. That’s another 17, for a GRAND TOTAL OF 68 INDIVIDUAL CHORDS!! If you had an epiphany, your welcome. Open any songbook, and you will find most songs have somewhere between 1-10 or more chords. MANY songs only require1- 3 chords. And instead of using the offered “chord box ” of finger placement, use this bar chord method. Just look at the NAME of the chord above the box and in MOST cases, you will be able to find the E bar chord equivalent. If not, then use the box. The point of eventually learning all 3 bar chords, is to avoid having to slide your hand up and down the neck in order to complete the chord structure of the song.( when you only use this Ebar chord formation) When you are able to choose between each bar chord structure, your hand can basically stay in one place on the neck, allowing the melody line to also be at your fingertips. I will get into the other 2 bar chords soon. Now that you have a little “theory” information, lets move to the other hand and explain some BASICS.
The Pick/Strum
To make the bar chord work, you will obviously need to use your other hand to create sound. The thumb can be easy, and soft sounding, and even a “must” with fingerpicking to create bass lines. But I spent many years becoming proficient, only to find i was wasting my time by putting off the JOY of the pick. Clarity, Attack, and being “heard” when playing guitar with others, is what you get when you use a pick. I can’t recommend it enough. With practice, it will become second nature, and a part of your hand. And really, In my opinion, the point of this site is to save you the years I’ve spent on wasted effort, and just plain bad methodology.
HOLDING THE PICK
Picks are made of various materials, and thicknesses. Most players start out on a thin pick. But for speed, clarity, and response time, I’ve found the thicker the better. Nylon picks are to me, the best. They won’t break like the cheaper plastic picks, and thicker ones hold their shape and rigidness the longest. Dunlop, or the like, is a good choice with a higher mm. Some come with “grip” bumps (helpful) and “holes” (terrible). But after years, I’ve abandoned those for a smooth face. You grip it between the flat area of the pointer finger’s first joint, and the side of the thumb, with just enough protruding to play a string up and down, without the digits touching the strings. The thinner pics may feel easier, but they create an annoying slapping sound your better off without. And MANY players will allow the tips of the pinkie and other fingers to rest on the top or face of the guitar. I have learned that doing this, not only affects the resonance of the sound ,dulling it, and shortening the “sustain”. (Aka.. how long the note rings).it also slows your speed when playing lead. But MOST importantly, by keeping all your fingers curled up, you will be able to use the fleshy part of the hand below the thumb. Just like a piano has what’s called a “soft” pedal, (for deadening all the inadvertent overtones created) that part of the hand will be used on the guitar strings to the same effect. When picking, and strumming, you constantly lift, and then lightly touch this part of the hand on the strings. The same goes for the bar chord your making. You don’t HOLD it all the time. You flex it. Lift it slightly, but NOT off the strings, in between strums. This is one reason why people tend to give up on bar chords. If you don’t do this and always squeeze it down, your hand will surely cramp. Both are subtle techniques, but a must. As soon as I figure out how to download a vid, (u tube link I guess ) you will see all this info will take less than 15 min to explain. Plus an example of me playing 😊
The Strum
Now that your holding the pick, you will need to know some fundamentals. A “pluck” strum is a good start. Thinking of the 2 thickest strings as your “Bass” strings, you pluck downwards on the thickest one, then strum all. Pluck/strum. Doing this with a continuous rhythm can be tricky at first. And to pluck individual notes, you almost Always use an alternate up/down with the pick. I will get into this in more depth with a vid.
